
How to Paint a Realistic Portrait with Watercolors
Watercolor painting is a beautiful art form that requires patience, skill, and practice. Painting a realistic portrait with watercolors can be a challenging task, but with the right techniques and tools, you can achieve stunning results.
Materials Needed
Before you start painting, you will need to gather the necessary materials. Here are some of the things you will need:
- Watercolor paper
- Watercolor paints
- Paintbrushes (round and flat)
- Palette
- Water container
- Pencil
- Eraser
- Reference photo or model
Preparation
Once you have gathered your materials, you will need to prepare your workspace. Make sure you have a clean, well-lit area to work in. Stretch your watercolor paper to prevent it from buckling when wet. Sketch your portrait lightly with a pencil, using a reference photo or model as a guide.
Techniques
Watercolor painting requires a delicate touch and a lot of patience. Here are some techniques that will help you create a realistic portrait:
- Layering: Build up your colors gradually, layer by layer, to create depth and dimension.
- Wet-on-wet: Apply wet paint to wet paper to create soft, blended edges.
- Dry-brush: Use a dry brush to create texture and detail.
- Splattering: Create a splatter effect by flicking your paintbrush against your finger.
With these techniques and some practice, you can create a beautiful, realistic watercolor portrait that will be a true work of art.
Materials Needed
Before starting your portrait painting, you need to gather the following materials:
Watercolor Paints
You will need a set of high-quality watercolor paints. It is recommended to use artist-grade paints, as they have a higher pigment concentration and produce better results. You can choose from a variety of colors to create the desired skin tone and other details.
Watercolor Paper
Watercolor paper is specially designed to handle the wetness of watercolors. It is thicker than regular paper and has a rough texture that helps to hold the paint. You can choose from different sizes and weights of watercolor paper, depending on your preference.
Paint Brushes
You will need a set of paint brushes with different sizes and shapes. A round brush is ideal for creating fine details, while a flat brush is useful for covering larger areas. It is recommended to use natural hair brushes, such as sable or squirrel, for a smoother finish.
Watercolor Palette
A watercolor palette is used to hold and mix your paints. You can choose from different types of palettes, such as plastic or ceramic, depending on your preference. It is recommended to have a palette with several wells to mix different colors.
Container of Water
You will need a container of water to dilute your paints and clean your brushes. It is recommended to use two containers of water, one for cleaning and one for diluting, to avoid mixing colors.
Pencil or Sketching Pen
You will need a pencil or sketching pen to sketch your portrait on the watercolor paper before painting. It is recommended to use a light hand and avoid pressing too hard, as it can damage the paper.
Conclusion
Having the right materials is essential for painting a realistic portrait with watercolors. Make sure to gather all the necessary materials before starting your painting to ensure a smooth and enjoyable process.
Preparing to Paint
Before you begin painting a realistic portrait with watercolors, there are a few important steps you should take to prepare yourself and your materials. These steps will help ensure that your final painting looks as realistic as possible.
Choose Your Reference Photo
The first step in preparing to paint a realistic portrait is to choose a reference photo. This photo will serve as the basis for your painting, so it’s important to choose a photo that has good lighting, clear details, and a pose that you like. Look for a photo that has good contrast between light and dark areas, as this will help you create depth and dimension in your painting.
Sketch Your Portrait
Once you have your reference photo, it’s time to sketch your portrait. Use a pencil and a piece of paper to sketch out the basic shapes and proportions of your subject’s face. Pay close attention to the placement of the eyes, nose, and mouth, as these features will be the most important in creating a realistic likeness. Don’t worry about adding too much detail at this stage – your sketch is just a rough draft that will serve as a guide for your painting.
Transfer Your Sketch to Watercolor Paper
After you have your sketch, it’s time to transfer it to your watercolor paper. Use a lightbox or a window to trace your sketch onto your watercolor paper using a pencil. Be sure to use a light touch when tracing, as heavy lines can show through your paint. Once your sketch is transferred, you’re ready to start painting!
Following these steps will help you prepare to paint a realistic portrait with watercolors. With a good reference photo, a solid sketch, and a properly transferred drawing, you’ll be ready to move on to the next steps of painting your portrait.
Painting Your Portrait
Now that you have completed the initial sketch and have a good understanding of the proportions of the face, it’s time to start painting. Here are some tips for painting each individual element of the portrait:
Paint the Skin Tones
The key to painting realistic skin tones is to layer your colors. Start with a light wash of the base color and gradually add darker shades as you build up the layers. Don’t be afraid to mix in a bit of complementary colors to add depth and warmth to the skin. Remember to pay attention to the shadows and highlights on the face, and use a lighter touch when painting areas like the forehead, nose, and cheeks that catch the light.
Paint the Eyes
The eyes are the windows to the soul, so it’s important to get them right. Start by painting the whites of the eyes, then add the iris and pupil. Use a fine brush to add details like the eyelashes and any reflections in the eyes. Pay close attention to the shape and placement of the eyes, as they can greatly affect the overall expression of the portrait.
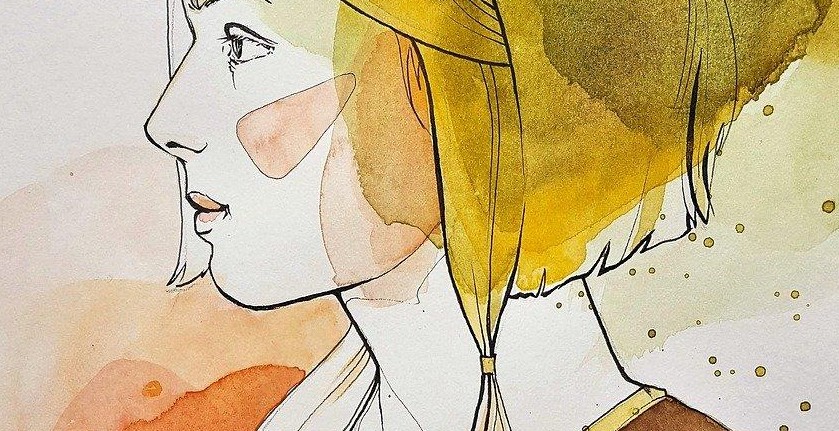
Paint the Hair
Painting hair can be tricky, but the key is to start with a light wash of the base color and gradually add darker shades to create depth and texture. Use a fine brush to add individual strands of hair, and pay attention to the direction of the hair growth. Don’t forget to add highlights and shadows to make the hair look more realistic.
Paint the Clothing and Background
When painting the clothing and background, it’s important to consider the overall color scheme of the portrait. Use complementary colors to create contrast and add interest to the painting. Pay attention to the folds and wrinkles in the clothing, and use a light touch when painting the background so as not to distract from the main focus of the portrait.
By following these tips and techniques, you can create a realistic and lifelike portrait with watercolors. Remember to take your time and be patient, and don’t be afraid to experiment with different colors and techniques until you achieve the desired result.
Adding Details
Now that you have the basic structure of your portrait painted, it’s time to add some details that will bring your painting to life. This section will cover how to add shadows and highlights, as well as how to create texture and add finer details to your painting.
Add Shadows and Highlights
Shadows and highlights are essential to creating a realistic portrait. They add depth and dimension to your painting, making it look more three-dimensional. To add shadows, you can use a darker shade of the color you’re already using. Apply the darker color to the areas of the painting that would naturally be in shadow, such as under the chin or around the eyes. To add highlights, use a lighter shade of your base color and apply it to the areas where the light would naturally hit, such as the forehead or cheekbones.
Add Texture
Texture can also add depth to your painting. You can create texture by using different brush strokes or adding salt to your paint. To create a rough texture, use a dry brush and apply the paint in short, choppy strokes. To create a smoother texture, use a wet brush and apply the paint in long, fluid strokes. You can also sprinkle salt on your painting while it’s still wet to create a unique texture.
Add Details
Finally, it’s time to add the finer details to your portrait. This can include the individual strands of hair, the texture of clothing, or the fine lines around the eyes. Use a small brush and a steady hand to add these details. Remember to step back from your painting every now and then to make sure everything looks proportional.
| Technique | Description |
|---|---|
| Shadows and Highlights | Use darker and lighter shades to add depth to your painting |
| Texture | Use different brush strokes or add salt to create texture |
| Details | Add finer details with a small brush and steady hand |
Final Touches
Now that you have completed the bulk of your painting, it’s time to add the final touches that will bring your portrait to life. The final touches include removing the masking fluid and adding final details.
Remove the Masking Fluid
Masking fluid is a liquid that is used to protect certain areas of the painting from watercolor paint. It is usually applied to areas that need to remain white or light-colored. Once the painting is complete, you can remove the masking fluid by gently rubbing it off with your fingers or using an eraser.
Be careful not to damage the paper while removing the masking fluid. If you find that the masking fluid is difficult to remove, you can use a small amount of rubbing alcohol on a cotton swab to help dissolve it.
Add Final Details
Now that the masking fluid has been removed, you can add the final details to your portrait. This includes adding highlights, shadows, and texture to the hair, skin, and clothing. Use a small brush and a light touch to add these details, being careful not to overdo it.
Remember that less is often more when it comes to watercolor painting. You want to capture the essence of your subject without getting bogged down in too many details. Step back from your painting frequently to assess your progress and make adjustments as needed.
With these final touches, your realistic watercolor portrait is complete. Frame it and display it proudly!
Conclusion:
In conclusion, painting a realistic portrait with watercolors requires patience, practice, and attention to detail. It is a challenging but rewarding process that can produce stunning results. By following the steps outlined in this article, you can improve your skills and create portraits that capture the essence of your subject.
Remember to start with a good reference photo and sketch out your composition before beginning to paint. Use light washes and build up the layers gradually to create depth and dimension. Pay attention to the details of the face, such as the eyes, nose, and mouth, and use various techniques to capture the textures and tones of the skin.
As you become more comfortable with the process, experiment with different color palettes and styles to create your own unique portraits. Don’t be afraid to make mistakes and learn from them. With practice and perseverance, you can become a skilled watercolor portrait artist.
Tips for Success:
- Practice regularly to improve your skills
- Experiment with different techniques and styles
- Take breaks and step back to view your work from a different perspective
- Don’t be afraid to make mistakes and learn from them
- Enjoy the process and have fun!