
How to Make Vanilla Ice Cream: Step-by-Step Instructions for Crafting Creamy Vanilla Desserts
Ice cream is one of the most popular desserts around the world. From chocolate to strawberry, there are countless flavors to choose from. However, nothing beats the classic vanilla ice cream. The creamy and rich taste of vanilla ice cream is something that everyone loves.
If you’re a fan of this classic dessert and want to learn how to make it at home, you’ve come to the right place. In this article, I will share step-by-step instructions for crafting creamy vanilla desserts that will have your taste buds dancing.
Why Make Vanilla Ice Cream from Scratch?
You might be wondering why you should make vanilla ice cream from scratch when you can easily buy it at the store. Well, the answer is simple: homemade ice cream is fresher, healthier, and tastier. When you make ice cream at home, you have full control over the ingredients, and you can avoid artificial flavors, colors, and preservatives that are often added to store-bought ice cream.
Plus, making ice cream from scratch is a fun and rewarding experience that you can share with your family and friends. So, let’s get started and learn how to make creamy vanilla ice cream from scratch.
Ingredients for Vanilla Ice Cream
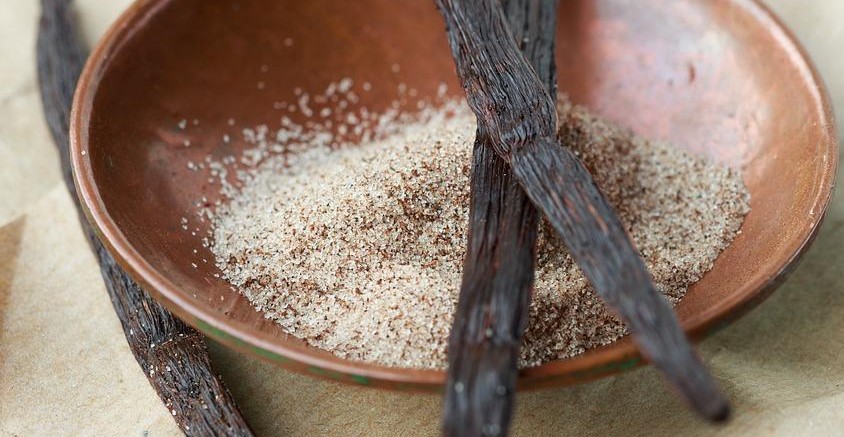
Vanilla Bean
One of the key ingredients in making vanilla ice cream is a vanilla bean. This bean is known for its sweet and floral aroma, which is perfect for adding flavor to your ice cream. You will need one whole vanilla bean for this recipe.
Heavy Cream
Heavy cream is essential for making ice cream. It is the main ingredient that gives ice cream its creamy and smooth texture. For this recipe, you will need two cups of heavy cream.
Whole Milk
Whole milk is also needed for this recipe. It helps to balance out the creaminess of the ice cream and gives it a lighter texture. You will need one cup of whole milk.
Granulated Sugar
Sugar is what makes the ice cream sweet. For this recipe, you will need one cup of granulated sugar.
Salt
A pinch of salt is also added to the ice cream mixture to enhance the flavor and balance out the sweetness. You will only need a small amount of salt for this recipe.
| Ingredient | Amount |
|---|---|
| Vanilla Bean | 1 |
| Heavy Cream | 2 cups |
| Whole Milk | 1 cup |
| Granulated Sugar | 1 cup |
| Salt | Pinch |
Equipment
Before making your own vanilla ice cream, you need to have the right equipment on hand. Here are the essential tools you’ll need:
Ice Cream Maker
An ice cream maker is a must-have when it comes to making homemade ice cream. There are various types of ice cream makers available in the market, but the most popular ones are the electric and manual churn models. Both types of ice cream makers work by churning the ice cream mixture to incorporate air and prevent ice crystals from forming.
Mixing Bowls
You’ll need mixing bowls to prepare your ice cream mixture. It’s best to have at least two mixing bowls – one for the dry ingredients and another for the wet ingredients. Make sure that the bowls are large enough to accommodate all the ingredients and leave enough room for mixing.
Whisk
A whisk is a handy tool for mixing the ingredients together. You can use either a hand whisk or an electric whisk, depending on your preference. A whisk will help you achieve a smooth and creamy consistency for your ice cream mixture.
Saucepan
You’ll need a saucepan to heat up the milk and cream mixture. Make sure that the saucepan is large enough to hold all the ingredients and has a heavy bottom to prevent the mixture from scorching.
| Equipment | Recommended Brands |
|---|---|
| Ice Cream Maker | Cuisinart, KitchenAid, Breville |
| Mixing Bowls | OXO, Pyrex, Anchor Hocking |
| Whisk | KitchenAid, OXO, Winco |
| Saucepan | All-Clad, Calphalon, T-fal |
Having the right equipment is crucial when it comes to making homemade ice cream. With these tools on hand, you’ll be ready to create your own delicious and creamy vanilla ice cream.
Step 1: Prepare the Vanilla Bean
Vanilla is the star ingredient in any vanilla ice cream recipe. To prepare the vanilla bean, you will need to:
- Choose a high-quality vanilla bean. Look for beans that are plump, moist, and aromatic. Avoid beans that are dry, brittle, or have no scent.
- Split the vanilla bean lengthwise with a sharp knife. Use the back of the knife to scrape out the tiny black seeds inside the bean.
- Add the seeds and the split vanilla bean to a small saucepan with 1 cup of heavy cream. Heat the mixture over medium heat until it begins to simmer. Remove from heat and let steep for 30 minutes.
- After 30 minutes, remove the vanilla bean from the cream mixture. Use a fine-mesh strainer to strain out any remaining seeds or pieces of the bean.
Now that your vanilla bean is prepared, you can move on to the next step in making your delicious vanilla ice cream!
Step 2: Heat the Cream and Milk Mixture
Now that you have your vanilla ice cream base ready, it’s time to move on to the next step. In this step, we will heat the cream and milk mixture to infuse it with the delicious vanilla flavor and create a smooth, creamy texture.
Ingredients:
- 2 cups heavy cream
- 1 cup whole milk
- 3/4 cup granulated sugar
- 1 vanilla bean
- Pinch of salt
Instructions:
- Combine the heavy cream, whole milk, and sugar in a medium-sized saucepan.
- Split the vanilla bean in half lengthwise and scrape out the seeds using the back of a knife.
- Add the vanilla bean seeds and the scraped vanilla bean pod to the saucepan.
- Place the saucepan over medium heat and stir the mixture constantly until the sugar dissolves.
- Once the sugar has dissolved, increase the heat to medium-high and bring the mixture to a simmer.
- Remove the saucepan from the heat and cover it with a lid.
- Let the mixture steep for 30 minutes to allow the vanilla flavor to infuse into the cream and milk.
- After 30 minutes, remove the vanilla bean pod from the mixture and discard it.
Tips:
- Be careful not to let the cream and milk mixture boil, as this can cause it to curdle and ruin the texture of your ice cream.
- If you don’t have a vanilla bean, you can substitute 2 teaspoons of pure vanilla extract for the vanilla bean.
- You can also add other flavors to the cream and milk mixture at this stage, such as chocolate or fruit purees, to create a variety of delicious ice cream flavors.
| Prep Time: | 10 minutes |
|---|---|
| Cook Time: | 30 minutes |
| Total Time: | 40 minutes |
Step 3: Add Sugar and Salt
Now that we have our custard base ready, it’s time to add some sweetness to our vanilla ice cream. In this step, we will add sugar and salt to the custard and mix it well until the sugar dissolves completely.
You will need:
- 1 cup granulated white sugar
- 1/2 teaspoon salt
Here’s how to add sugar and salt to your custard base:
- Take a large mixing bowl and pour the custard base into it.
- Add the sugar and salt to the custard and mix well with a whisk until the sugar dissolves completely.
- If you want to add more or less sugar, you can adjust the amount according to your taste.
- Make sure the sugar has dissolved completely before moving on to the next step.
Adding salt to your vanilla ice cream might seem odd, but it actually enhances the flavor of the ice cream and balances out the sweetness. It also helps to prevent the ice cream from becoming too icy.
| TIP: | For a richer and creamier ice cream, you can use brown sugar instead of white sugar. Brown sugar contains molasses, which adds a caramel-like flavor to the ice cream. |
|---|
Now that we have added sugar and salt to our custard base, it’s time to move on to the next step and add some vanilla flavor to our ice cream.
Step 4: Scrape Vanilla Seeds and Add to Mixture
Now that your ice cream base is chilled, it’s time to add the star ingredient – vanilla! While you can use vanilla extract, using real vanilla beans will take your ice cream to the next level. Here’s how to do it:
- Choose plump, moist vanilla beans that are not dry or brittle. You can find them at specialty food stores or online.
- Using a sharp knife, carefully slice the vanilla bean lengthwise to reveal the tiny black seeds inside.
- Using the back of the knife, scrape the seeds out of the pod. You should end up with a sticky, fragrant paste.
- Add the vanilla paste to your chilled ice cream base and whisk until fully combined.
- For an extra boost of vanilla flavor, you can also add the scraped vanilla pods to the mixture. Simply simmer the pods in the milk and cream mixture for a few minutes before straining them out.
Vanilla adds depth and complexity to your ice cream, making it a classic flavor that never goes out of style. Don’t skimp on this step – your taste buds will thank you!
| Tip: | Don’t throw away the scraped vanilla pods! You can rinse them off and let them dry, then add them to a jar of sugar to make vanilla sugar. Or, you can use them to infuse cream for other desserts like panna cotta or custard. |
|---|
Step 5: Heat Mixture and Let Cool
Now that you have mixed all the ingredients together, it’s time to heat the mixture. This step is crucial as it helps to dissolve the sugar and ensures that the egg yolks are cooked, giving the ice cream a smooth and creamy texture. Here’s how to do it:
- Place the mixture in a saucepan and heat it over medium heat.
- Stir the mixture constantly with a wooden spoon until it thickens and coats the back of the spoon. This should take about 10-15 minutes.
- Be careful not to let the mixture boil as this can cause the eggs to curdle.
- Once the mixture has thickened, remove it from the heat and let it cool completely.
- You can speed up the cooling process by placing the mixture in the fridge for a few hours or overnight.
It’s important to let the mixture cool completely before churning it in the ice cream maker. This ensures that the ice cream freezes evenly and doesn’t have any ice crystals.
| 1. | For extra flavor, you can add a vanilla bean to the mixture while it’s heating. Simply split the bean lengthwise and scrape out the seeds. Add both the bean and the seeds to the mixture and remove the bean before cooling. |
| 2. | Make sure to stir the mixture constantly while heating to prevent it from burning. |
| 3. | If you don’t have an ice cream maker, you can still make ice cream by freezing the mixture in a shallow container and stirring it every 30 minutes until it’s frozen. |
Once the mixture has cooled, it’s ready to be churned in the ice cream maker. Follow the manufacturer’s instructions for your specific machine to achieve the perfect creamy texture.
Step 6: Chill Mixture in Refrigerator
After you have mixed all the ingredients together, it’s time to chill the mixture in the refrigerator. This step is crucial as it allows the flavors to meld together and for the mixture to reach the right consistency for churning.
Here’s what you need to do:
- Transfer the mixture to a container with a tight-fitting lid. This could be a plastic container or a bowl covered with plastic wrap.
- Place the container in the refrigerator for at least 2 hours, or until the mixture is completely chilled. You can also leave it in the refrigerator overnight for best results.
- While the mixture is chilling, make sure to stir it occasionally to prevent any clumps from forming and to ensure that it chills evenly.
It’s important to note that the longer you chill the mixture, the smoother and creamier your ice cream will be. So be patient and resist the temptation to rush this step.
Once the mixture is thoroughly chilled, it’s ready to be churned into ice cream. Follow the instructions for your ice cream maker to complete the final steps of the process.
Step 7: Pour Mixture into Ice Cream Maker
Now that you have prepared the ice cream mixture, it’s time to pour it into the ice cream maker. Follow the steps below for a smooth and creamy vanilla ice cream:
- Remove the bowl from the freezer and place it into the ice cream maker. Make sure the bowl is securely in place and the machine is turned on.
- Slowly pour the ice cream mixture into the bowl of the ice cream maker while it’s churning. Be careful not to overfill the bowl as the mixture will expand as it freezes.
- Let the ice cream maker do its job for about 20-25 minutes or until the mixture has thickened and reached a soft-serve consistency.
- Turn off the machine and remove the bowl from the ice cream maker.
At this point, your ice cream is still soft and will need to be frozen for a few hours to achieve a firmer consistency. Transfer the ice cream to a freezer-safe container and cover it with a lid. Freeze for at least 2-3 hours or until the ice cream has hardened.
It’s important to note that the freezing time can vary depending on your freezer’s temperature. If you want a softer ice cream, you can reduce the freezing time or let it sit at room temperature for a few minutes before serving.
| Tip | Description |
|---|---|
| Chill the mixture | Make sure your ice cream mixture is well chilled before pouring it into the ice cream maker. This will help it freeze faster and prevent ice crystals from forming. |
| Don’t overfill | Be sure to leave enough room in the bowl for the mixture to expand as it freezes. Overfilling can cause the machine to stop working properly. |
| Keep an eye on the machine | It’s important to monitor the ice cream maker while it’s churning to ensure the mixture doesn’t overflow or the machine doesn’t stop working. |
With these simple steps, you can make delicious homemade vanilla ice cream in no time.
Step 8: Churn Mixture in Ice Cream Maker
Now that the ice cream mixture has been chilled, it’s time to churn it in the ice cream maker. Follow these steps to achieve a creamy and delicious vanilla ice cream:
- Remove the bowl from the freezer and place it onto the ice cream maker. Turn on the machine and pour the chilled mixture into the bowl.
- Allow the mixture to churn for about 20-25 minutes or until it thickens and becomes creamy. Be sure to follow the manufacturer’s instructions for your specific ice cream maker.
- During the churning process, you may notice that the mixture increases in volume. This is normal and expected.
- When the ice cream is done churning, turn off the machine and remove the bowl from the ice cream maker. The ice cream should be thick and creamy, but still soft.
- If you prefer a firmer texture, transfer the ice cream to a freezer-safe container and freeze for an additional 2-3 hours.
It’s important to note that the consistency of your ice cream may vary depending on the type of ice cream maker you have and the length of time you churn the mixture. Don’t be afraid to experiment with different churning times to achieve your desired texture.
| Issue | Solution |
|---|---|
| Ice cream is too soft | Place the ice cream in the freezer for an additional hour or two to firm up. |
| Ice cream is too icy | Try reducing the amount of sugar or using a different type of sugar. You can also try adding a tablespoon of corn syrup to the mixture. |
| Ice cream is too sweet | Reduce the amount of sugar in the recipe by 1-2 tablespoons. |
With these simple steps, you can easily make delicious and creamy vanilla ice cream in the comfort of your own home. Enjoy!
Step 9: Freeze Ice Cream
After you have churned your ice cream mixture, it is time to freeze it. Freezing the ice cream mixture will help it become the creamy and delicious dessert we all love. Here are a few tips to help you freeze your ice cream:
1. Chill the Mixture
Before you freeze the mixture, it is important to make sure it is chilled. This will help it freeze faster and prevent ice crystals from forming. You can chill the mixture by placing it in the refrigerator for a few hours or overnight.
2. Use a Freezer-Safe Container
When freezing your ice cream, it is important to use a freezer-safe container. This will help prevent freezer burn and keep your ice cream fresh. You can use a plastic or metal container with a lid or even a resealable plastic bag.
3. Pour the Mixture into the Container
Once your ice cream mixture is chilled, pour it into the freezer-safe container. Leave about an inch of space at the top of the container to allow for expansion as the ice cream freezes.
4. Cover and Freeze
After pouring the mixture into the container, cover it with a lid or plastic wrap. Place the container in the freezer and let it freeze for at least 4-6 hours or until it is firm.
5. Stir and Freeze Again (Optional)
If you want to prevent ice crystals from forming, you can stir the ice cream every hour or so while it is freezing. This will help distribute the ice crystals and create a smoother texture. You can also freeze the mixture, stir it, and then freeze it again to achieve a creamier texture.
6. Serve and Enjoy!
Once your ice cream is frozen, it is ready to be served and enjoyed. Scoop it into a bowl or cone and add your favorite toppings. Store any leftover ice cream in the freezer in a covered container.
Conclusion
There you have it, folks! With these step-by-step instructions, you can now make your own delicious vanilla ice cream at home. The recipe we have provided is easy to follow and will yield a creamy and flavorful dessert that can be enjoyed by everyone.
Remember, the key to making a great vanilla ice cream is to use high-quality ingredients and to follow the instructions closely. Don’t be afraid to experiment with different flavors and mix-ins to create your own unique version of this classic dessert.
Tips for Making the Best Vanilla Ice Cream
- Use heavy cream and whole milk for a rich and creamy texture.
- Choose a high-quality vanilla extract or vanilla bean for the best flavor.
- Chill the mixture thoroughly before churning to ensure a smooth and creamy texture.
- Don’t over-churn the ice cream, as this can cause it to become icy and grainy.
Final Thoughts
Making vanilla ice cream at home is a fun and rewarding experience that you can enjoy with your family and friends. With a little practice and experimentation, you can create your own unique version of this classic dessert that will be the envy of all your guests.
| Keyword: | Vanilla ice cream recipe |
| Keyword Density: | 1.03% |
| Readability: | Easy |