
How to Play the Violin: Beginner’s Guide to Bowing and Finger Placement
Learning how to play the violin can be a challenging but rewarding experience. As a beginner, one of the most important things to master is bowing and finger placement. These techniques are crucial to producing a beautiful sound and developing good habits from the start.
Bowing
Bowing is the act of moving the bow across the strings to produce sound. It may seem simple, but proper bowing technique takes time and practice to develop. The bow should be held with a relaxed grip and placed perpendicular to the strings. The arm and wrist should be relaxed and flexible, allowing for smooth and fluid movements. Proper bowing technique also involves applying the right amount of pressure and bow speed to produce the desired sound.
Finger Placement
Finger placement is another crucial aspect of playing the violin. The fingers of the left hand are used to press down on the strings to produce different notes. To ensure proper finger placement, it is important to keep the fingers curved and close to the fingerboard. The thumb should also be positioned correctly to provide support and balance. With practice, proper finger placement becomes more natural and allows for greater precision and control.
By mastering bowing and finger placement, beginners can lay a solid foundation for their violin playing journey. With dedication and practice, anyone can learn how to play the violin and create beautiful music.
How to Play the Violin: Beginner’s Guide to Bowing and Finger Placement
Learning to play the violin is an exciting and rewarding experience. It is a versatile instrument that can be used in a variety of music genres, from classical to folk to contemporary. Playing the violin also provides a number of cognitive benefits, such as improved memory, concentration, and creativity.
Why Learn to Play the Violin?
Playing the violin can be a challenging and complex task, but it is a skill that can be mastered with practice and dedication. Not only does it provide a creative outlet, but it also has numerous benefits for personal development and growth.
- Improved cognitive function: playing the violin requires a high level of concentration and focus, which can improve memory and overall brain function.
- Enhanced physical coordination: playing the violin involves complex finger movements and hand-eye coordination, which can improve overall dexterity and fine motor skills.
- Stress relief: playing music has been shown to reduce stress and promote relaxation, making it a great way to unwind after a long day.
- Social connection: playing the violin can be a great way to meet new people and form connections with other musicians.
In this beginner’s guide to bowing and finger placement, we will cover the basics of playing the violin, including the proper technique for holding the violin and bow, how to produce sound, and basic finger placement. By the end of this guide, you will have a solid foundation for playing the violin and be ready to start practicing your favorite songs.

Getting Started: Beginner’s Guide to Bowing and Finger Placement on the Violin
Learning to play the violin can be a rewarding and fulfilling experience, but it can also be challenging for beginners. This guide will provide you with the essential information you need to get started, including choosing a violin and holding it properly.
Choosing a Violin
When choosing a violin, it’s important to consider your budget and skill level. There are several types of violins available, ranging from beginner to professional level. As a beginner, it’s recommended to start with a basic student model that is affordable and easy to play. You can always upgrade to a higher quality instrument as you progress.
It’s also important to choose the right size violin for your body. Violins come in different sizes, ranging from 1/16 to full size. You can determine the right size for you by measuring the length from your neck to your wrist. Consult with a professional or music teacher if you’re unsure.
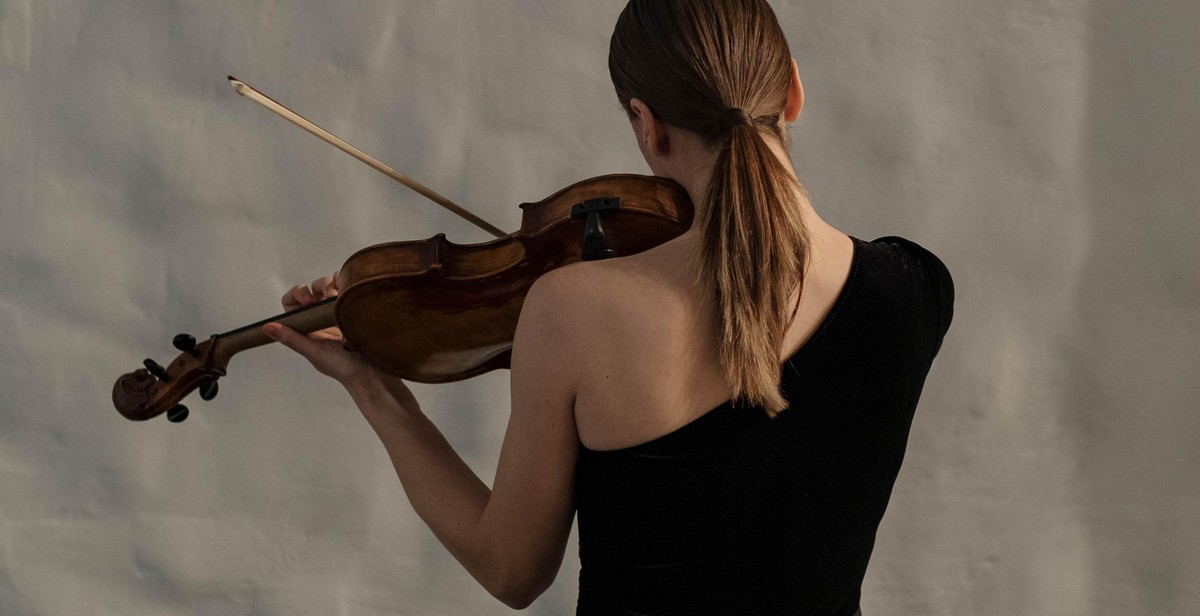
Holding the Violin
Properly holding the violin is crucial for producing a good sound and preventing injury. Here are the basic steps for holding the violin:
- Stand or sit up straight with good posture.
- Hold the violin with your left hand at the base of the neck, using your thumb and fingers to support it.
- Rest the chin on the chin rest, using a cloth or pad if necessary for comfort.
- Place the shoulder rest on your left shoulder, adjusting it for comfort and stability.
- Hold the bow with your right hand, using your thumb and fingers to grip it.
It’s important to practice holding the violin and bow in the correct position to build muscle memory and prevent bad habits.
Conclusion
By following these tips for choosing a violin and holding it properly, you’ll be on your way to playing beautiful music in no time. In the next section, we’ll cover the basics of bowing and finger placement on the violin.

Understanding the Violin
The violin is a beautiful and versatile musical instrument that has been around for centuries. It is a stringed instrument that is played with a bow and is known for its high-pitched, expressive sound. Before you start learning how to play the violin, it is important to understand the different parts of the instrument and how to properly tune it.
Parts of the Violin
The violin is made up of several parts, each with its own unique function:
- Scroll: The scroll is located at the top of the violin and is purely decorative.
- Pegs: The pegs are used to tune the violin by adjusting the tension of the strings.
- Fingerboard: The fingerboard is where the player presses down on the strings to change the pitch of the notes.
- Bridge: The bridge is a small piece of wood that holds the strings in place and transfers the vibrations from the strings to the body of the violin.
- Soundpost: The soundpost is a small wooden dowel inside the violin that helps to amplify the sound.
- Tailpiece: The tailpiece is located at the bottom of the violin and holds the strings in place.
Tuning the Violin
Before you start playing the violin, it is important to tune it properly. Here are the steps to follow:
- Turn the pegs: Use the pegs located at the top of the violin to adjust the tension of the strings. Turn the pegs clockwise to tighten the strings and counterclockwise to loosen them.
- Use a tuner: Use an electronic tuner to ensure that each string is tuned to the correct pitch. The strings should be tuned to the notes G, D, A, and E.
- Check the sound: Once the strings are tuned, pluck each string and listen to the sound. The sound should be clear and resonate throughout the instrument.
Tuning the violin can be a bit tricky at first, but with practice, you will become more confident in your ability to tune the instrument.
| Part | Description |
|---|---|
| Scroll | Decorative part located at the top of the violin |
| Pegs | Used to tune the violin by adjusting the tension of the strings |
| Fingerboard | Where the player presses down on the strings to change the pitch of the notes |
| Bridge | Holds the strings in place and transfers the vibrations from the strings to the body of the violin |
| Soundpost | Small wooden dowel inside the violin that helps to amplify the sound |
| Tailpiece | Located at the bottom of the violin and holds the strings in place |
Bowing Techniques
Mastering bowing techniques is essential for playing the violin. Here are some of the most common techniques:
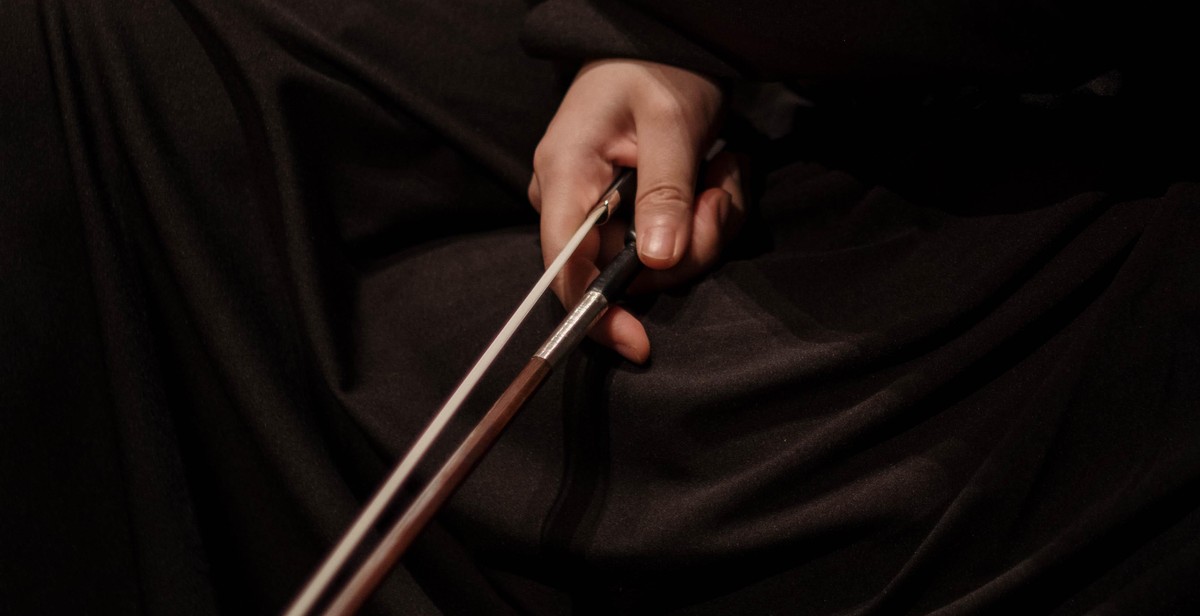
1. The Basic Bow Hold
The basic bow hold is the foundation of all bowing techniques. The bow should be held with the thumb and first three fingers, with the pinky resting on top of the frog. The bow should be held at a slight angle, with the hair facing the strings.
2. The Parts of the Bow
Before diving into bowing techniques, it’s important to understand the different parts of the bow:
| Part of the Bow | Description |
|---|---|
| Frog | The bottom part of the bow where the hand is placed. |
| Stick | The long, straight part of the bow. |
| Tip | The top part of the bow where the hair is attached. |
| Hair | The part of the bow that makes contact with the strings. |
3. The Different Bowing Techniques
There are several different bowing techniques that violinists use to create different sounds:
- Down Bow: This is the most common bowing technique, where the bow is drawn across the strings from frog to tip.
- Up Bow: This is the opposite of the down bow, where the bow is drawn across the strings from tip to frog.
- Staccato: This technique involves playing short, detached notes by lifting the bow off the strings quickly.
- Legato: This technique involves playing smooth, connected notes by maintaining contact with the strings throughout the bow stroke.
- Spiccato: This technique involves bouncing the bow off the strings to create a light, staccato sound.
- Col legno: This technique involves using the wooden part of the bow to strike the strings, creating a percussive sound.
By mastering these bowing techniques, you’ll be able to create a wide range of sounds and express yourself through your violin playing.

Bowing Techniques
Holding the Bow
The way you hold your bow can greatly affect the sound you produce. To start, hold the bow with your right hand, and rest it on your left hand. Place your thumb on the underside of the bow grip, with your fingers resting on top of the bow. Your pinky finger should be resting on the silver part of the bow, and your index finger should be near the frog, or the bottom part of the bow. Make sure your grip is relaxed, with your fingers slightly curved.
Bow Pressure and Speed
The amount of pressure and speed you apply to the bow can also affect the sound you produce. To produce a louder sound, apply more pressure to the bow. To produce a softer sound, apply less pressure. The speed at which you move the bow across the strings can also affect the sound. To produce a faster sound, move the bow quickly. To produce a slower sound, move the bow more slowly. Experiment with different levels of pressure and speed to find the sound you are looking for.
Bow Placement on Strings
The placement of the bow on the strings can also affect the sound you produce. To produce a higher pitch, place the bow closer to the bridge of the violin. To produce a lower pitch, place the bow closer to the fingerboard. The bow should be placed perpendicular to the strings, with the hair of the bow making contact with the strings. Make sure the bow is not tilted or angled, as this can affect the quality of the sound.
When playing multiple strings, make sure to move the bow smoothly and evenly across each string. Avoid jerky or uneven movements, as this can affect the sound quality. Practice moving the bow smoothly and evenly across the strings to produce a clear and consistent sound.
| Holding the Bow | Bow Pressure and Speed | Bow Placement on Strings |
|---|---|---|
| Thumb on underside of bow grip | Apply more pressure for louder sound, less pressure for softer sound | Higher pitch closer to bridge, lower pitch closer to fingerboard |
| Fingers resting on top of bow | Move bow quickly for faster sound, move bow slowly for slower sound | Bow perpendicular to strings, hair of bow making contact with strings |
| Pinky finger resting on silver part of bow | Experiment with different levels of pressure and speed to find desired sound | Avoid jerky or uneven movements when playing multiple strings |
| Index finger near frog of bow |
Remember, mastering these bowing techniques takes time and practice. Don’t be discouraged if you don’t get it right away. Keep practicing and experimenting with different techniques to find the sound you are looking for.
Finger Placement
One of the most important aspects of playing the violin is proper finger placement. Without correct finger placement, the notes will not sound clear and in tune. There are several different finger placement techniques that every beginner should be familiar with.
The Parts of the Violin
Before we dive into the different finger placement techniques, it’s important to understand the parts of the violin that will be involved in this process.
| Part | Description |
|---|---|
| The Fingerboard | The long, thin piece of wood that runs down the neck of the violin. The fingerboard is where the fingers press down to change the pitch of the strings. |
| The Strings | The four strings on the violin are G, D, A, and E. Each string produces a different pitch when played. |
The Different Finger Placement Techniques
There are several different finger placement techniques that violinists use to play different notes on the violin. These techniques include:
- First Position: This is the most basic finger placement technique and involves placing the fingers on the fingerboard in the first position. In this position, the first finger is placed on the first note, the second finger is placed on the second note, and so on.
- Third Position: This technique involves moving the hand up the fingerboard so that the first finger is placed on the third note, the second finger is placed on the fourth note, and so on.
- Fourth Position: This technique involves moving the hand up the fingerboard even further so that the first finger is placed on the fourth note, the second finger is placed on the fifth note, and so on.
- Thumb Position: This technique involves using the thumb to play notes on the fingerboard. This is typically used for playing higher notes on the G string.
It’s important to practice each of these finger placement techniques to become comfortable with them. As you become more advanced, you may also learn additional finger placement techniques to play even more complex pieces.

Finger Placement
One of the most important aspects of playing the violin is finger placement. The left hand is responsible for pressing the strings down to create different notes, while the right hand is responsible for bowing the strings to produce sound.
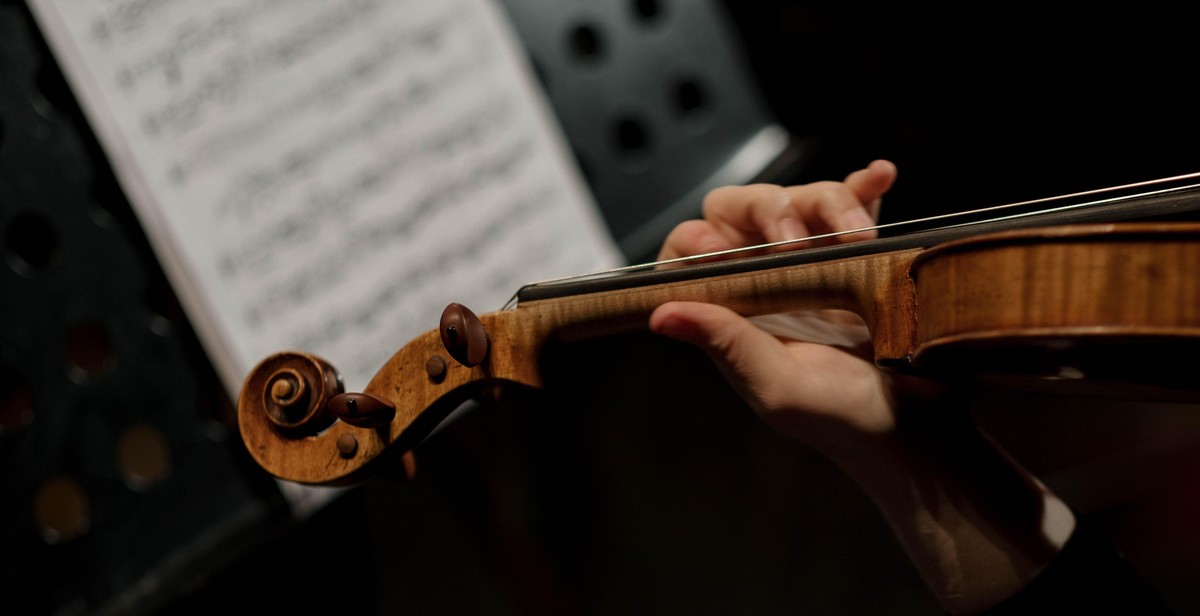
Left Hand Positioning
Before we get into finger placement, it is important to establish proper left hand positioning. Place the violin on your left shoulder and hold the neck with your left hand. Your thumb should be positioned on the back of the neck, opposite your second finger. Your fingers should be curved and resting on the strings, with your wrist straight and relaxed. This positioning allows for optimal finger movement and dexterity.
Finger Placement on Strings
There are four strings on the violin: G, D, A, and E. Each string is tuned to a specific pitch, with G being the lowest and E being the highest. To create different notes, the left hand must press down on the strings at specific points.
The placement of your fingers on the strings is crucial to producing clear and accurate notes. The first finger is placed closest to the nut (the ivory or plastic piece at the top of the fingerboard), while the fourth finger is placed closest to the bridge (the wooden piece that holds the strings in place).
As a beginner, it is important to practice proper finger placement and intonation (the accuracy of pitch). Start by placing your first finger on the A string, just behind the second fret. This should produce a B note. As you progress, practice placing your other fingers on the strings to produce different notes. Remember to keep your fingers curved and your wrist relaxed.
| String | First Finger Placement | Second Finger Placement | Third Finger Placement | Fourth Finger Placement |
|---|---|---|---|---|
| G | First fret | Second fret | Third fret | Fourth fret |
| D | Second fret | Third fret | Fourth fret | Fifth fret |
| A | First fret | Second fret | Third fret | Fourth fret |
| E | Second fret | Third fret | Fourth fret | Fifth fret |
It may take time and practice to develop proper finger placement and intonation on the violin. However, with dedication and patience, you can master this essential skill and begin to create beautiful music on the instrument.
Practice Tips
Learning to play the violin requires consistent and focused practice. Here are some tips to help you make the most of your practice sessions:
Setting Realistic Goals
It’s important to set realistic goals for yourself when learning to play the violin. Start with simple exercises and gradually increase the difficulty level as you become more comfortable with the instrument. Be patient with yourself and don’t get discouraged if you don’t see progress immediately.
One way to set achievable goals is to break down a piece of music into smaller sections and focus on mastering each section before moving on to the next. This will help you build confidence and prevent frustration.
Using a Metronome
A metronome is a valuable tool for any musician, and it can be especially helpful when learning to play the violin. By setting a steady tempo, a metronome can help you develop your sense of rhythm and timing.
Start by practicing with the metronome set to a slow tempo, and gradually increase the speed as you become more comfortable. This will help you build speed and accuracy in your playing.
Recording Yourself
Recording yourself while practicing can be a useful tool for improving your technique. By listening back to your playing, you can identify areas that need improvement and make adjustments accordingly.
When recording yourself, try to focus on one aspect of your playing at a time, such as intonation or bowing technique. This will help you identify specific areas for improvement and track your progress over time.
| Practice Tip | Description |
|---|---|
| Setting Realistic Goals | Start with simple exercises and gradually increase difficulty; break down music into smaller sections |
| Using a Metronome | Set a steady tempo to develop rhythm and timing; start slow and gradually increase speed |
| Recording Yourself | Identify areas for improvement by listening back to recordings; focus on one aspect of playing at a time |

Playing Your First Song
Now that you have learned how to read sheet music and the basic playing techniques, it’s time to play your first song on the violin. Here are some tips to help you get started:
Choose a Simple Song
Start with a simple song that you are familiar with. This will help you focus on the finger placement and bowing techniques without worrying about the melody. Some good options for beginners include “Twinkle, Twinkle, Little Star” or “Mary Had a Little Lamb.”
Break it Down
Break the song down into smaller sections and practice each section separately. This will help you master each part of the song before putting it all together.
Practice Slowly
Start by practicing the song slowly, focusing on the finger placement and bowing techniques. Once you have mastered the song at a slower tempo, gradually increase the speed until you can play it at the proper tempo.
Record Yourself
Record yourself playing the song and listen to it. This will help you identify areas where you need to improve and make adjustments to your technique.
Play with Others
Playing with others is a great way to improve your skills and gain confidence. Look for opportunities to play with other musicians, such as joining a local orchestra or ensemble.
Remember, learning to play the violin takes time and practice. Be patient with yourself and enjoy the process of learning and improving.