
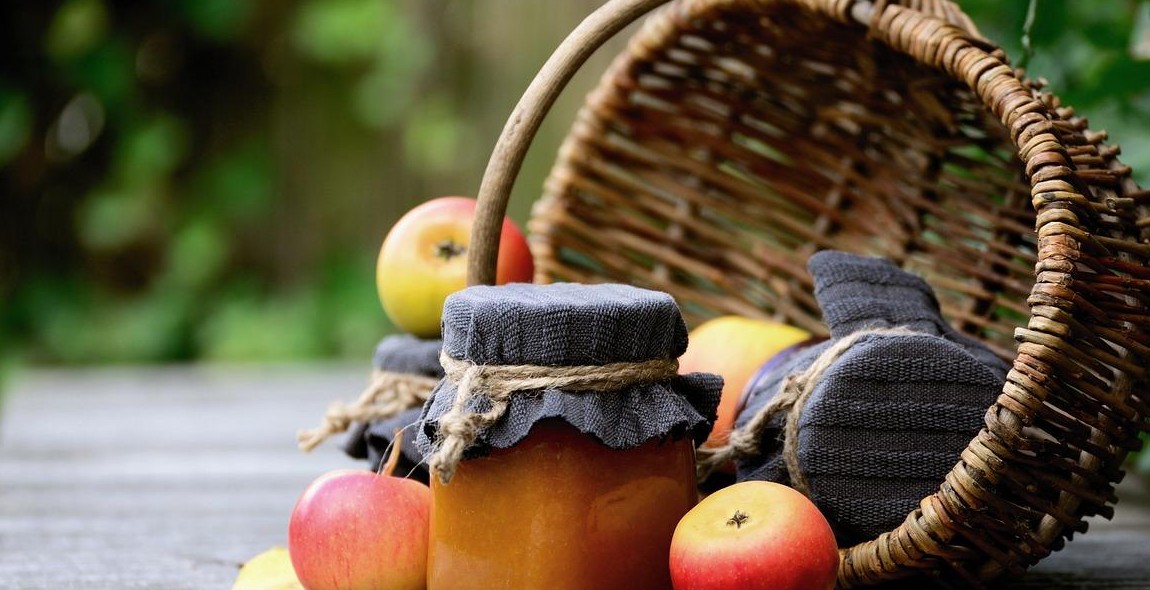
How to Make Delicious Homemade Jam and Preserves
Homemade jam and preserves are a delicious way to enjoy the fruits of your labor, literally. Making your own jam and preserves allows you to control the ingredients and customize the flavors to your liking. Plus, it’s a great way to use up a surplus of fresh fruit before it goes bad.
Why Make Homemade Jam and Preserves?
Store-bought jams and preserves are often loaded with added sugars and preservatives. Making your own allows you to use natural sweeteners and avoid any unwanted additives. Plus, homemade jam and preserves have a fresh, vibrant flavor that simply can’t be matched by store-bought versions.
What You’ll Need
To make homemade jam and preserves, you’ll need a few basic tools and ingredients:
- Fresh fruit
- Sugar or natural sweetener
- Pectin (optional)
- A large pot
- Canning jars with lids
- A canning funnel
- A ladle
The Process
The process of making homemade jam and preserves involves cooking down the fruit with sugar and/or pectin until it thickens and reaches the desired consistency. The mixture is then poured into sterilized canning jars and processed in a boiling water bath to seal the jars and preserve the contents.
With a little bit of patience and practice, you can become a master at making delicious homemade jam and preserves that will impress your family and friends.
Why Make Your Own Jam and Preserves?
Making your own jam and preserves is not only a fun and rewarding activity, but it also has numerous benefits. Here are some reasons why you should consider making your own jam and preserves:
1. Health Benefits
When you make your own jam and preserves, you have full control over the ingredients. You can use fresh, organic fruits and avoid any additives or preservatives that store-bought jams and preserves may contain. This means that you can enjoy the health benefits of fresh fruits without any added sugars or chemicals.
2. Cost-Effective
Making your own jam and preserves can be a cost-effective alternative to buying them from the store. You can buy fruits in bulk when they are in season and at their cheapest, and make large batches of jam and preserves that can last you for months.
3. Customizable Flavors
When you make your own jam and preserves, you can experiment with different flavors and combinations. You can add spices, herbs, or even alcohol to create unique and delicious flavors that you can’t find in stores.
4. Environmentally Friendly
Making your own jam and preserves reduces waste and helps the environment. You can reuse glass jars and reduce the amount of plastic packaging that would otherwise end up in landfills.
5. Fun Activity
Making jam and preserves can be a fun activity to do with family and friends. It is a great way to spend time together and create something delicious that you can all enjoy.
Overall, making your own jam and preserves has numerous benefits. It is a healthy, cost-effective, customizable, and environmentally friendly activity that can also be a fun and rewarding experience.

Choosing the Right Fruit
When it comes to making delicious homemade jam and preserves, choosing the right fruit is crucial. The quality and freshness of the fruit you use will directly impact the flavor and texture of your final product. There are two main factors to consider when choosing fruit for your jam or preserves: whether to use fresh or frozen fruit, and whether to use in-season or out-of-season fruit.
Fresh vs. Frozen Fruit
One of the first decisions you’ll need to make is whether to use fresh or frozen fruit. Fresh fruit is always the best option if it’s available, as it will have the best flavor and texture. However, if you’re making jam or preserves out of season, frozen fruit may be your only option. In either case, it’s important to choose high-quality fruit that is ripe and free from any bruises or blemishes.
If you’re using fresh fruit, make sure to wash it thoroughly and remove any stems, seeds, or pits before using. Frozen fruit should be thawed completely before using, and any excess liquid should be drained off.
In-Season vs. Out-of-Season Fruit
Another important factor to consider is whether to use in-season or out-of-season fruit. In-season fruit will be at its peak flavor and will generally be more affordable than out-of-season fruit. It’s also easier to find high-quality, fresh in-season fruit at your local farmers’ market or grocery store.
Out-of-season fruit can still be used to make delicious jam and preserves, but it may be more expensive and have a slightly less vibrant flavor. If you do choose to use out-of-season fruit, make sure to choose fruit that is still relatively fresh and in good condition.
| Fresh Fruit | Frozen Fruit | In-Season Fruit | Out-of-Season Fruit |
|---|---|---|---|
| Best flavor and texture | May be the only option out of season | Peak flavor and more affordable | More expensive and less vibrant flavor |
| Wash and remove any stems, seeds, or pits before using | Thaw completely and drain any excess liquid | Easier to find high-quality, fresh fruit | Choose fruit that is still relatively fresh and in good condition |
By considering these factors and choosing high-quality fruit, you’ll be well on your way to making delicious homemade jam and preserves that you and your family can enjoy all year round.

Preparing the Fruit
Before you start making your homemade jam and preserves, it’s important to properly prepare the fruit. This includes washing and drying the fruit, as well as cutting and mashing it.
Washing and Drying the Fruit
The first step in preparing the fruit is to wash it thoroughly. This will remove any dirt, debris, or pesticides that may be on the fruit. To wash the fruit, place it in a colander and rinse it under cold running water. Be sure to scrub the fruit gently with your hands to remove any dirt or debris.
After washing the fruit, it’s important to dry it thoroughly. Use a clean kitchen towel or paper towels to pat the fruit dry. Be sure to remove any excess moisture, as this can affect the texture and consistency of your jam or preserves.
Cutting and Mashing the Fruit
Once the fruit is washed and dried, it’s time to cut and mash it. The method you use will depend on the type of fruit you’re using. Here are some general guidelines:
- Berries: For small berries like strawberries or raspberries, you can leave them whole or cut them in half. For larger berries like blackberries or blueberries, you may want to mash them slightly with a fork or potato masher.
- Stone fruit: For fruit like peaches, plums, or apricots, you’ll need to remove the pit before cutting the fruit into small pieces.
- Apples: For apples, you’ll need to peel and core them before cutting them into small pieces.
Once the fruit is cut, you can mash it with a fork, potato masher, or food processor. The goal is to break down the fruit into small pieces or a puree, depending on your preference.
| Fruit | Cutting Method | Mashing Method |
|---|---|---|
| Strawberries | Halved or Whole | Fork or Potato Masher |
| Blueberries | Whole or Slightly Mashed | Fork or Potato Masher |
| Peaches | Pitted and Cut into Small Pieces | Food Processor or Fork |
| Apples | Peeled, Cored, and Cut into Small Pieces | Food Processor or Fork |
Adding Sweeteners and Flavorings
Homemade jam and preserves are a great way to preserve the flavors of fresh fruits and enjoy them all year round. While the natural sweetness of the fruit is often enough to make a delicious jam, adding sweeteners and flavorings can take your homemade jams to the next level. Here are some tips on how to add sweeteners and flavorings to your homemade jams and preserves:
Sugar and Honey
Sugar is the most common sweetener used in jam making, and it not only adds sweetness but also helps to preserve the jam. When using sugar, it is important to use the right amount to achieve the desired consistency and sweetness. A good rule of thumb is to use equal parts fruit and sugar by weight. For example, if you have 1 pound of fruit, use 1 pound of sugar.
If you want to reduce the amount of sugar in your jam, you can use honey as a natural sweetener. Honey can also add a unique flavor to your jam, depending on the type of honey you use. When using honey, it is important to use a recipe that is specifically designed for honey, as it can affect the consistency of the jam.
Spices and Herbs
Adding spices and herbs to your jam can add a new dimension of flavor and complexity. Some popular spices and herbs to add to jam include cinnamon, vanilla, ginger, and thyme. When adding spices and herbs, it is important to use them sparingly, as they can easily overpower the flavor of the fruit.
A good rule of thumb is to add no more than 1 teaspoon of spice or herb per pound of fruit. You can also experiment with different combinations of spices and herbs to find the perfect flavor for your jam.
Here is a table of some popular sweeteners and flavorings for homemade jams:
| Sweeteners | Flavorings |
|---|---|
| Sugar | Cinnamon |
| Honey | Vanilla |
| Maple Syrup | Ginger |
| Agave Nectar | Thyme |
Remember, the key to making delicious homemade jam and preserves is to experiment with different combinations of sweeteners and flavorings until you find the perfect recipe for your taste buds.
Cooking the Jam and Preserves
Once you have your chosen fruit and ingredients prepared, it’s time to start cooking your jam or preserves. There are two main methods for cooking jam and preserves: the boiling method and the slow cooker method.
The Boiling Method
The boiling method is the traditional way of making jam and preserves. It involves cooking the fruit and sugar mixture over high heat until it reaches the setting point. Here’s how to do it:
- Place the fruit and sugar in a large, heavy-bottomed pot.
- Heat the mixture over high heat, stirring constantly, until the sugar has dissolved.
- Bring the mixture to a rolling boil, stirring occasionally.
- After 15-20 minutes, test the jam by placing a spoonful on a cold plate. If it wrinkles when you push it with your finger, it’s ready. If not, continue boiling and testing every few minutes.
- Once the jam has reached the setting point, remove it from the heat and let it cool for a few minutes.
- Spoon the jam into sterilized jars and seal immediately.
The boiling method can be a little tricky, as the mixture can easily burn if left unattended. However, it’s a great way to make large batches of jam quickly.
The Slow Cooker Method
The slow cooker method is a more hands-off approach to making jam and preserves. It involves cooking the fruit and sugar mixture in a slow cooker on low heat for several hours. Here’s how to do it:
- Place the fruit and sugar in a slow cooker.
- Cook the mixture on low heat for 4-6 hours, stirring occasionally.
- After 4-6 hours, test the jam by placing a spoonful on a cold plate. If it wrinkles when you push it with your finger, it’s ready. If not, continue cooking and testing every hour.
- Once the jam has reached the setting point, remove it from the slow cooker and let it cool for a few minutes.
- Spoon the jam into sterilized jars and seal immediately.
The slow cooker method is great for those who don’t want to spend a lot of time stirring a pot on the stove. However, it does take longer than the boiling method and may not be suitable for making large batches of jam.
| Method | Pros | Cons |
|---|---|---|
| Boiling Method | Fast, suitable for large batches | Requires constant attention, easy to burn |
| Slow Cooker Method | Hands-off, less likely to burn | Takes longer, may not be suitable for large batches |
Testing for Doneness
Testing for doneness is crucial to ensure that your homemade jam and preserves are safe to consume and will last for a long time. Here are some methods to test for doneness:
Plate Test
To perform the plate test, place a small plate or saucer in the freezer before you start cooking the jam. Once you think the jam has reached its desired consistency, take the plate out of the freezer and drop a small spoonful of jam onto the plate. Let it sit for a minute, then push it with your finger. If the jam wrinkles and holds its shape, it is done. If it is still runny, continue cooking and test again in a few minutes.
Temperature Test
The temperature test is a more accurate way to test for doneness. Use a candy thermometer to measure the temperature of the jam. When the temperature reaches 220°F (104°C), the jam is done.
Spoon Test
The spoon test is another easy way to test for doneness. Dip a cold metal spoon into the hot jam and hold it up. If the jam runs off the spoon in a thin stream, it is not done yet. If it runs off in thick, heavy drops, it is done.
Once you have determined that the jam is done, remove it from the heat and let it cool for a few minutes. Skim off any foam or bubbles that have formed on the surface, then ladle the jam into sterilized jars and seal them tightly.
| Fruit | Plate Test | Temperature Test | Spoon Test |
|---|---|---|---|
| Strawberries | Wrinkles and holds shape | 220°F (104°C) | Thick, heavy drops |
| Blueberries | Wrinkles and holds shape | 220°F (104°C) | Thick, heavy drops |
| Raspberries | Wrinkles and holds shape | 220°F (104°C) | Thick, heavy drops |
| Blackberries | Wrinkles and holds shape | 220°F (104°C) | Thick, heavy drops |
| Peaches | Thickens and slides slowly | 220°F (104°C) | Thick, heavy drops |
| Plums | Thickens and slides slowly | 220°F (104°C) | Thick, heavy drops |

Canning and Storing
Once your homemade jam or preserve is ready, it’s important to properly can and store it to ensure its longevity and safety for consumption. Here are the three key steps to follow:
Sterilizing the Jars
Before filling your jars with your homemade jam or preserve, it’s crucial to sterilize them to eliminate any bacteria or microorganisms that could spoil your jam. Here’s how to do it:
- Wash the jars and lids in hot, soapy water and rinse well.
- Place the jars and lids in a large pot and cover with water.
- Bring the water to a boil and let the jars and lids boil for at least 10 minutes.
- Using tongs, carefully remove the jars and lids from the pot and let them dry on a clean towel.
Filling and Sealing the Jars
Once your jars are sterilized and dry, it’s time to fill them with your homemade jam or preserve. Here’s how to do it:
- Using a ladle or funnel, carefully pour the jam or preserve into the jars, leaving about ¼ inch of space at the top.
- Wipe the rims of the jars with a clean, damp cloth to remove any spills or drips.
- Place the lids on the jars and screw the bands on tightly.
Storing the Jars
Proper storage is essential for preserving the flavor and quality of your homemade jam or preserve. Here’s how to store your jars:
- Store your jars in a cool, dry place away from direct sunlight.
- Label your jars with the date and type of jam or preserve.
- Consume your jam or preserve within one year for the best quality and flavor.
- If you notice any signs of spoilage, such as mold or an off odor, discard the jar immediately.
Following these three simple steps will ensure that your homemade jam or preserve stays fresh and flavorful for months to come.

Conclusion
Making homemade jam and preserves is a fun and rewarding activity that can be enjoyed by anyone. With the right ingredients, tools, and techniques, anyone can create delicious spreads that are perfect for toast, biscuits, and more. Whether you are a seasoned jam maker or a beginner, there are a few key tips to keep in mind when making your own preserves.
Choose the Right Ingredients
The key to making delicious homemade jam and preserves is to use the freshest and highest quality ingredients available. Whether you are using fresh fruit or frozen, be sure to choose varieties that are ripe and in season. This will ensure that your jam is bursting with flavor and has the perfect texture.
Invest in Quality Equipment
Having the right tools and equipment is essential for making homemade jam and preserves. Invest in a high-quality pot, a reliable thermometer, and a good set of canning jars to ensure that your preserves turn out perfectly every time.
Follow Proper Canning Techniques
When canning your homemade jam and preserves, it is important to follow proper techniques to ensure that your spreads are safe to eat and have a long shelf life. Always sterilize your jars and lids, use a reliable recipe, and process your jars in a boiling water bath for the recommended amount of time.
With these tips in mind, you can create delicious homemade jam and preserves that are sure to impress your family and friends. So why not give it a try and see what tasty creations you can come up with?