
Introduction: The Importance of Food Photography
Food photography is a vital aspect of the food industry, as it allows businesses to showcase their products in the most appealing way possible. Whether it’s for a restaurant menu, a food blog, or a cookbook, great food photography can make all the difference in attracting customers and inspiring them to try a particular dish.
In today’s digital age, where social media has become an integral part of our lives, food photography has become even more important. Platforms like Instagram, Pinterest, and Facebook have made it easier than ever to share stunning food photos with the world, and businesses that fail to take advantage of this trend risk being left behind.
The Challenges of Food Photography
Despite its importance, food photography can be challenging, even for experienced photographers. Capturing the perfect shot requires a keen eye for detail, a good understanding of lighting and composition, and a range of editing skills to enhance the final image.
Furthermore, food photography presents unique challenges that are not present in other types of photography. For example, food can be difficult to style and arrange, and it often requires a lot of preparation and attention to detail to ensure it looks its best in the final image.
In this article, we will explore some tips and techniques for editing and enhancing food photography, so that you can make your delicious dishes look irresistible.
Preparing for the Shoot
Before you start snapping pictures of your delicious dishes, it’s important to prepare for the shoot. This means gathering the right equipment, choosing the perfect background, and setting the mood with lighting. By taking the time to prepare, you’ll be able to capture stunning food photography that will make your audience’s mouths water.
Gather the Right Equipment
Having the right equipment is essential for capturing high-quality food photography. This includes a camera with a high-resolution sensor, a tripod to keep your camera steady, and a selection of lenses to capture different angles and perspectives. You may also want to invest in a set of diffusers and reflectors to control the lighting and reduce harsh shadows.
Choose the Perfect Background
The background you choose for your food photography can make or break the shot. You want to select a background that complements the colors and textures of the food, but doesn’t compete with it. A simple, clean background like a white or neutral-colored surface can work well for most dishes. Alternatively, you may want to experiment with different textures and patterns to add interest and depth to your photos.
Set the Mood with Lighting
Lighting is one of the most important elements of food photography. You want to use lighting to highlight the textures and colors of the food, while also creating a mood and atmosphere. Natural light is often the best choice for food photography, as it is soft and diffused. However, if you’re shooting indoors or at night, you may need to use artificial lighting. Experiment with different lighting setups to find the one that works best for your particular dish.
By following these tips for preparing for the shoot, you’ll be able to capture stunning food photography that will make your audience hungry for more. Remember to take your time and experiment with different angles, backgrounds, and lighting setups to find the perfect shot.
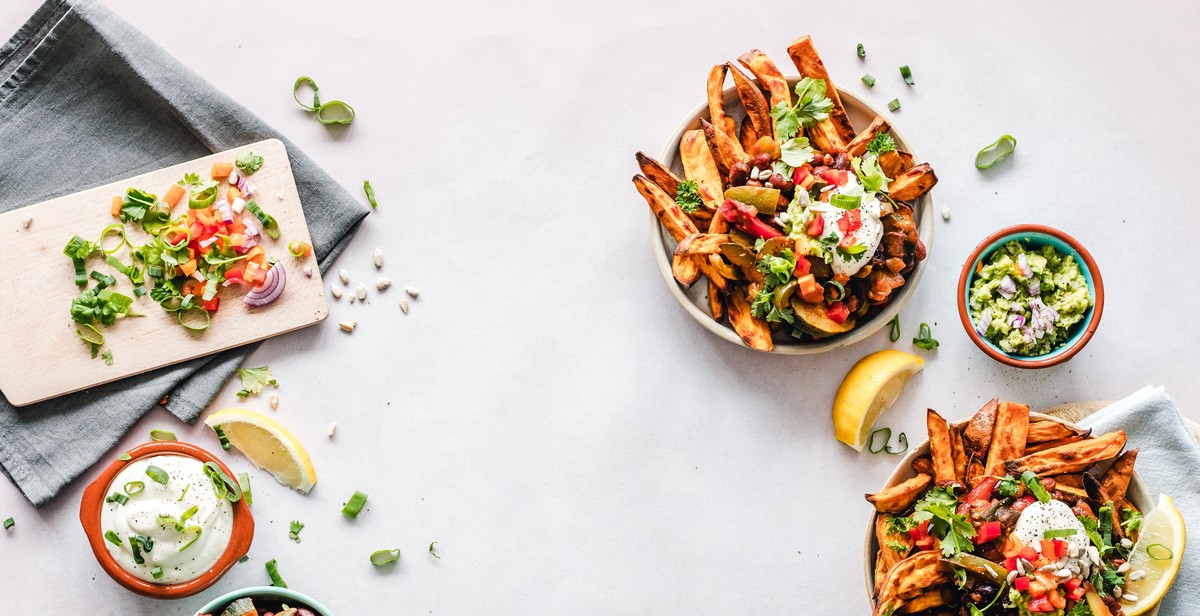
Food Styling
Food styling is an art that involves arranging and presenting food in an attractive and appetizing way. It is essential in food photography as it helps to make the food look more appealing and delicious. Here are some tips on how to style your food for the perfect shot:
Choose the Right Props
The right props can make all the difference in food photography. Choose props that complement the food and add interest to the shot without overpowering it. Use plates, bowls, and utensils that match the style and color of the food. You can also use napkins, tablecloths, and other decorative items to add texture and depth to the shot.
Arrange the Food
The way you arrange the food can make a big difference in the final shot. Start by arranging the main dish in the center of the plate and then add the sides and garnishes around it. Use odd numbers when arranging the food, as it creates a more interesting and dynamic composition. Don’t be afraid to play around with different arrangements until you find the perfect one.
Add Texture and Depth
Texture and depth are important elements in food photography. Use ingredients that add texture to the dish, such as sesame seeds, chopped nuts, or herbs. You can also add depth by layering the food or using different heights and angles. Use props like wooden boards or rustic backgrounds to add depth and interest to the shot.
Overall, food styling is about creating an image that looks good enough to eat. By choosing the right props, arranging the food in an appealing way, and adding texture and depth, you can create a mouth-watering image that will leave your audience wanting more.
Camera Settings and Techniques
When it comes to food photography, choosing the right camera settings can make all the difference. Here are some tips to help you capture the perfect shot:
Choosing the Right Camera Settings
First and foremost, make sure your camera is set to shoot in RAW format. This will give you more flexibility when it comes to editing your photos later on. Set your ISO to the lowest possible setting to avoid noise in your images. Use a wide aperture (low f-stop number) to create a shallow depth of field and make your subject stand out. Finally, adjust your shutter speed to ensure a properly exposed image.
Mastering Depth of Field
Depth of field refers to the area in your photo that is in focus. In food photography, a shallow depth of field is often used to blur the background and make the food the main focus. To achieve this effect, use a wide aperture (low f-stop number) and focus on the part of the dish that you want to highlight. Experiment with different aperture settings to find the perfect balance between sharpness and blur.
Using Angles to Your Advantage
Angles can also play a big role in food photography. Shooting from above is a popular choice, as it allows you to capture the entire dish and any accompanying props or garnishes. However, don’t be afraid to experiment with different angles. Shooting from a low angle can create a sense of drama and make the food appear larger than life. Shooting from the side can highlight the texture and details of the dish. Play around with different angles to find the one that best showcases your subject.
By following these camera settings and techniques, you’ll be well on your way to capturing mouth-watering food photos that are sure to make your audience hungry.
Editing and Enhancing Your Photos
Editing and enhancing your food photography is an essential step in making your dishes look irresistible. Here are some basic and advanced editing techniques, as well as tips for enhancing colors and contrast.
Basic Editing Techniques
Basic editing techniques include adjusting the brightness, contrast, and saturation of your photos. These adjustments can help make your photos look more vibrant and appealing.
- Brightness: Increasing the brightness of your photo can make it look more inviting and appetizing. However, be careful not to overdo it and wash out your photo.
- Contrast: Adjusting the contrast can help make your photo look more dynamic and bring out the details in your dish.
- Saturation: Increasing the saturation can make the colors in your photo pop and look more vibrant.
Advanced Editing Techniques
Advanced editing techniques involve more complex adjustments such as removing unwanted objects, adjusting the white balance, and sharpening your photo.
- Removing unwanted objects: If there are any distracting objects in your photo, you can use the clone or healing brush tool to remove them.
- White balance: Adjusting the white balance can help correct any color casts in your photo and make your dish look more natural.
- Sharpening: Sharpening your photo can help bring out the details in your dish and make it look more appetizing.
Enhancing Colors and Contrast
Enhancing the colors and contrast of your photo can help make your dish look more appetizing and appealing. Here are some tips:
- Adjust the levels: Adjusting the levels can help bring out the highlights and shadows in your photo and make your dish look more dynamic.
- Use selective color: Selective color can help you enhance certain colors in your photo and make them stand out.
- Use vibrance: Vibrance can help make the colors in your photo pop without oversaturating them.
| Before Editing | After Editing |
|---|---|
 |
 |
Conclusion
Editing and enhancing food photography is an essential skill for food bloggers, restaurant owners, and anyone who wants to showcase their delicious dishes in the best possible light. By following the tips and techniques discussed in this article, you can create stunning food photographs that will make your audience’s mouth water.
Remember that practice makes perfect, so don’t be afraid to experiment with different styles and techniques. You may find that a particular editing style works better for certain dishes or in certain lighting conditions. Keep trying new things, and you’ll soon develop your own unique style that sets your food photography apart.
Another important thing to remember is to have fun! Food photography is a creative and enjoyable process, and it should be a fun experience. Don’t get too caught up in the technical details and remember that the most important thing is to capture the essence of the dish and make it look irresistible.
So, whether you’re a professional food photographer or just starting out, keep these tips in mind and enjoy the process of creating beautiful and delicious food photographs.