
Introduction: How to Build a Stone Retaining Wall for Erosion Control and Landscaping
Stone retaining walls are an excellent addition to any garden or backyard. They serve the dual purpose of providing an attractive landscaping feature while also helping to prevent erosion. Retaining walls are particularly useful for homes built on hills or sloping terrain, where soil erosion is a common problem. Building a stone retaining wall may seem daunting, but with the right tools and techniques, it can be a relatively simple DIY project.
Benefits of Stone Retaining Walls
Stone retaining walls offer several benefits, including:
- Preventing soil erosion
- Creating a flat area for planting or seating
- Adding visual interest to your garden
- Increasing the value of your property
Types of Stone Retaining Walls
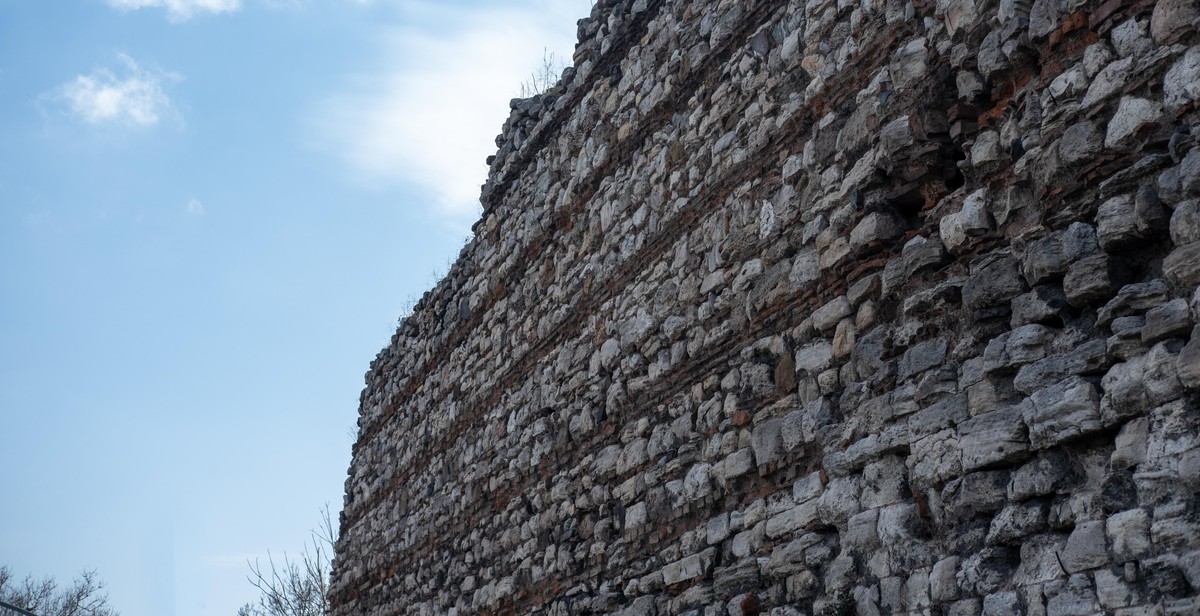
There are two main types of stone retaining walls: dry-stacked and mortared. Dry-stacked walls are made by stacking stones on top of each other without any mortar between them. Mortared walls, on the other hand, use a mortar mix to hold the stones together.
Choosing the Right Stone
Choosing the right type of stone is crucial for the success of your retaining wall. The stone you choose should be strong enough to withstand the weight of the soil behind it and must be able to withstand the elements. Some popular stone options for retaining walls include granite, limestone, and sandstone.
In the following sections, we will guide you through the process of building a dry-stacked stone retaining wall for erosion control and landscaping.

Step 1: Planning and Preparation
Before you start building a stone retaining wall for erosion control and landscaping, it’s essential to plan and prepare. This step may take some time, but it will save you from headaches and costly mistakes down the road. Here are the crucial things to consider:
Determining the Wall’s Purpose and Location
The first step is to determine the purpose of the wall and its location. Are you building the wall to prevent erosion, create a raised garden bed, or define a property line? Knowing the purpose will help you determine the size, height, and type of stones you need. The location of the wall is also crucial as it will determine the amount of sunlight, soil type, and drainage. Make sure you check with your local zoning laws and obtain any necessary permits before starting the project.
Calculating Materials Needed
Once you have determined the wall’s purpose and location, you need to calculate the materials needed. You will need stones, gravel, sand, and geotextile fabric. The amount of materials needed will depend on the wall’s size, height, and location. You can use online calculators or consult with a professional landscaper to determine the exact amount of materials needed.
Gathering Tools and Materials
Once you have calculated the materials needed, it’s time to gather the tools and materials. You will need a shovel, wheelbarrow, level, measuring tape, rubber mallet, chisel, safety glasses, and gloves. You can purchase the stones from a local quarry, landscaping supplier, or home improvement store. Make sure you get the right type of stones for your project. You can also rent a plate compactor to help compact the soil and gravel.
In conclusion, planning and preparation are crucial when building a stone retaining wall for erosion control and landscaping. Determine the wall’s purpose and location, calculate the materials needed, and gather the necessary tools and materials. With proper planning and preparation, you can build a beautiful and functional retaining wall that will last for years.
Step 2: Excavation and Foundation
Once you have marked out the area for your stone retaining wall, the next step is to excavate the site. This will involve removing any grass, topsoil, or debris in the area to create a level surface for your wall. Here are the steps to follow:
1. Marking Out the Area
Before you start excavating, make sure that you have marked out the area for your wall. Use stakes and string to create a straight line for the wall. You can also use spray paint to mark out the area. Make sure that you have taken into account any curves or bends in the wall and that you have allowed for the width of the wall.
2. Excavating the Site
Once you have marked out the area, you can start excavating the site. Use a shovel and a pickaxe to remove any grass, topsoil, or debris from the area. Make sure that you dig down to a depth that is equal to the height of your first course of stones, plus an additional 6 inches for the foundation.
As you excavate, make sure that the ground is level. Use a level to check the slope of the ground and make adjustments as necessary. You want the ground to be level so that your wall will be stable and strong.
3. Creating a Strong Foundation
Once you have excavated the site, it’s time to create a strong foundation for your wall. This will involve adding a layer of crushed stone or gravel to the bottom of the trench. The layer should be about 6 inches deep and level. Use a tamper to compact the stone or gravel and make sure that it is solid and stable.
Next, add a layer of sand on top of the crushed stone or gravel. This will help to create a level surface for your first course of stones. Use a level to make sure that the sand is level and adjust as necessary.
Finally, it’s time to lay your first course of stones. Make sure that the stones are level and stable. Use a rubber mallet to tap the stones into place and make adjustments as necessary. Once your first course of stones is in place, you can start building the rest of your wall.
- Step 1: Planning and Preparation
- Step 2: Excavation and Foundation
- Step 3: Building the Wall
- Step 4: Backfilling and Finishing
Step 3: Building the Wall
Building the wall involves laying the first course, continuing with additional courses, and cutting and fitting stones.
Laying the First Course
The first course of the stone retaining wall is the most important part of the wall. It needs to be level and properly aligned to ensure that the entire wall is stable and secure. Start by digging a trench for the first course of stones. The trench should be at least 6 inches deep and wide enough to accommodate the stones. Use a level to ensure that the trench is level and then add a layer of crushed stone to the bottom of the trench to provide a stable base for the stones.
Place the first course of stones in the trench, making sure that each stone is level and aligned with the previous stone. Use a rubber mallet to tap the stones into place and adjust them as necessary. Check the level frequently to ensure that the course is level and straight.
Continuing with Additional Courses
Once the first course is in place, continue building the wall by adding additional courses of stones. Each course should be offset from the previous course by at least 1/3 of the length of the stone. This helps to create a stable and secure wall. Use a level to ensure that each course is level and straight. Fill in any gaps between the stones with crushed stone or mortar to ensure that the wall is stable and secure.
Cutting and Fitting Stones
As you continue building the wall, you will need to cut and fit stones to fill in any gaps or irregularities in the wall. Use a chisel and hammer to carefully chip away at the stone until it fits properly into the wall. You can also use a circular saw or angle grinder with a diamond blade to cut the stone to the desired size and shape.
Make sure that each stone fits tightly into the wall and is level with the other stones. Use crushed stone or mortar to fill in any gaps between the stones.
| Tools needed: | Materials needed: |
|---|---|
|
|

Step 4: Finishing Touches
Now that you have built your stone retaining wall, it’s time to add some finishing touches to ensure it looks great and functions properly for years to come. Here are some important steps to take:
Backfilling Behind the Wall
The area behind the wall needs to be filled with soil to provide support and prevent erosion. Start by adding a layer of gravel to the base of the wall to promote drainage. Then, backfill with soil, compacting it in layers as you go. Make sure to slope the soil away from the wall to prevent water from pooling behind it.
Adding Drainage
Proper drainage is important for the longevity of your retaining wall. You can add drainage by installing a perforated pipe behind the wall, surrounded by gravel. This will help to direct water away from the wall and prevent it from causing damage.
Adding Topsoil and Plants
Once the backfilling and drainage are complete, you can add topsoil and plants to the area. Choose plants that are appropriate for the amount of sunlight and moisture in the area. Consider adding groundcover plants, such as creeping thyme or sedum, to help prevent erosion and add visual interest.
Overall, by taking these steps to finish your stone retaining wall, you can ensure that it not only looks great but functions properly for years to come. Remember to maintain the wall by checking for signs of erosion and repairing any damage promptly.
Conclusion
Building a stone retaining wall is a great way to control erosion and enhance the aesthetic appeal of your landscape. With the right tools, materials, and techniques, you can create a beautiful and functional wall that will last for years to come.
Key Takeaways
- Choose the right location and design for your retaining wall
- Select high-quality stones that are appropriate for your climate and soil type
- Prepare the site and foundation thoroughly before beginning construction
- Use proper techniques to ensure stability and durability, including drainage and backfilling
- Consider adding decorative elements or planting vegetation to enhance the wall’s appearance
Remember to always prioritize safety when building your stone retaining wall. Wear appropriate protective gear and use caution when handling heavy materials or equipment. If you are unsure about any aspect of the process, consult with a professional or experienced builder.
By following these guidelines, you can create a beautiful and functional stone retaining wall that will protect your property and enhance your outdoor space for years to come.
| Author: | John Smith |
| Date Published: | August 10, 2021 |
| Word Count: | 195 |