
How to Create a DIY Outdoor Movie Screen
Watching movies outdoors is a fun and exciting way to enjoy a warm summer evening with family and friends. With a DIY outdoor movie screen, you can transform your backyard into a cozy outdoor theater and enjoy your favorite movies under the stars. Creating a DIY outdoor movie screen is easy and affordable, and it requires only a few basic materials and tools.
Materials Needed
To create your own outdoor movie screen, you will need the following materials:
- A white tarp or sheet
- PVC pipes or wooden boards
- Rope or bungee cords
- Scissors or saw
- Measuring tape
- Blackout fabric or paint (optional)
Steps to Follow
Creating an outdoor movie screen is a simple process that can be completed in a few easy steps:
- Measure the area where you want to set up your screen.
- Cut your PVC pipes or wooden boards to the desired length and assemble them into a frame.
- Attach your white tarp or sheet to the frame using rope or bungee cords.
- If desired, paint or attach blackout fabric to the back of the screen to improve image quality.
- Set up your projector, speakers, and other equipment and enjoy your outdoor movie experience!
Creating a DIY outdoor movie screen is a fun and rewarding project that can be enjoyed for years to come. With a little creativity and some basic materials, you can create a cozy outdoor theater that will be the envy of your neighborhood.
Step 1: Gather Materials
The first step in creating a DIY outdoor movie screen is to gather all the necessary materials. These materials include:
Screen Material
The screen material is the most important part of your outdoor movie screen. You can choose from a variety of materials, but the most popular options are:
- White Tarp
- Blackout Cloth
- Projector Screen Fabric
Each of these materials has its own advantages and disadvantages. White tarps are affordable and easy to find, but they may not provide the best picture quality. Blackout cloth is a great option for those on a budget, but it may not be as durable as other options. Projector screen fabric is the most expensive option, but it provides the best picture quality and is the most durable.
Frame Material
The frame material is what will hold your screen material in place. You can choose from a variety of materials, but the most popular options are:
- PVC Pipe
- Wood
- Aluminum
PVC pipe is a popular option because it is affordable and easy to work with. Wood is a great option for those who want a more durable frame, but it can be more difficult to work with. Aluminum is the most expensive option, but it is the most durable and provides the most professional look.
Hardware
You will need hardware to assemble your frame and attach your screen material. The hardware you will need includes:
- Screws or Nails
- Corner Brackets
- Rope or Bungee Cords
Screws or nails will be used to attach your frame together. Corner brackets will help to reinforce the corners of your frame. Rope or bungee cords will be used to attach your screen material to your frame.
| Material | Advantages | Disadvantages |
|---|---|---|
| White Tarp | Affordable, easy to find | May not provide the best picture quality |
| Blackout Cloth | Affordable | May not be as durable as other options |
| Projector Screen Fabric | Best picture quality, most durable | Most expensive option |
Now that you have gathered all the necessary materials, you can move on to the next step in creating your DIY outdoor movie screen.

Step 2: Build the Frame
Once you have gathered all the necessary materials and tools, it’s time to start building the frame for your outdoor movie screen. This step involves cutting the frame pieces and assembling them together. Follow the steps below:
Cut the Frame Pieces
The first thing you need to do is cut the frame pieces to the required size. You will need four pieces of 2×4 lumber, two pieces of 1×2 lumber, and two pieces of PVC pipes.
Using a saw, cut the four pieces of 2×4 lumber to the following sizes:
- Two pieces measuring 8 feet long for the top and bottom of the frame
- Two pieces measuring 6 feet 9 inches long for the sides of the frame
Next, cut the two pieces of 1×2 lumber to the same length as the sides of the frame (6 feet 9 inches). These will be used as crossbars to support the screen.
Finally, cut the two PVC pipes to the same length as the top and bottom of the frame (8 feet). These will be used as supports for the screen.
Assemble the Frame
Once you have cut all the frame pieces to the required size, it’s time to assemble them together. Follow the steps below:
- Lay the two 8-foot pieces of 2×4 lumber parallel to each other, with a distance of 6 feet 9 inches between them.
- Place the two 6 feet 9 inches long pieces of 2×4 lumber perpendicular to the 8-foot pieces, one at the top and one at the bottom. Screw them in place using wood screws.
- Attach the two 6 feet 9 inches long pieces of 1×2 lumber across the frame, one about a foot from the top and the other about a foot from the bottom. Screw them in place.
- Insert the two PVC pipes through the sleeves of the screen and place them on top of the frame, one at the top and one at the bottom.
- Secure the PVC pipes in place by attaching them to the frame using screws.
Once you have completed these steps, your frame is ready. In the next step, we will attach the screen to the frame.
Step 3: Attach the Screen Material
Now that you have built the frame for your outdoor movie screen, it’s time to attach the screen material. Follow these simple steps:
Stretch the Screen Material
- Start by laying the screen material flat on the ground.
- Place the frame on top of the material, making sure that the material is centered and there is enough excess to wrap around the edges of the frame.
- Starting at the top of the frame, pull the material taut and staple it to the frame. Work your way down the sides, pulling the material taut and stapling it to the frame as you go.
- Once you reach the bottom of the frame, pull the material taut and staple it to the frame.
- Go back and add additional staples as needed to ensure that the material is securely attached to the frame and there are no wrinkles or sagging areas.
Secure the Screen Material
Once the screen material is attached to the frame, it’s important to ensure that it is securely in place. Follow these steps to make sure your outdoor movie screen is stable:
- Attach guy wires to the top corners of the frame to keep the screen from swaying in the wind. Use stakes to secure the guy wires to the ground.
- Attach bungee cords to the bottom corners of the frame to keep the screen taut and prevent it from flapping in the wind.
- Make sure that the frame is level and stable before setting up your projector and speakers.
By following these simple steps, you can create a DIY outdoor movie screen that is both sturdy and functional. Now it’s time to sit back, relax, and enjoy your favorite movies under the stars!

Step 4: Set Up the Projector and Sound System
Setting up the projector and sound system is a crucial step in creating a DIY outdoor movie screen. Follow these steps to ensure that you have the best viewing experience possible.
Choose the Right Projector
The first step in setting up your projector is choosing the right one for your needs. Look for a projector that has a high resolution and brightness level, as this will ensure that the image is clear and visible even in low light conditions.
You should also consider the throw distance of the projector. This is the distance between the projector and the screen. Make sure that the projector you choose can be positioned at the right distance from your screen to ensure that the image is the right size and in focus.
Position the Projector
Once you have chosen the right projector, the next step is to position it correctly. The projector should be positioned at a distance that is equal to or greater than the throw distance of the projector. This will ensure that the image is the right size and in focus.
You should also make sure that the projector is level and stable. Use a tripod or other stable surface to ensure that the projector does not move or wobble during the movie.
Set Up the Sound System
In addition to the projector, you will also need to set up a sound system. This will ensure that you have clear and high-quality audio to accompany the movie.
You can use a variety of different sound systems, including speakers or a home theater system. Make sure that the sound system you choose is compatible with your projector and that it has enough power to fill the outdoor space.
Once you have chosen the right sound system, position it near the screen and connect it to the projector. Test the sound system before the movie to ensure that it is working properly and that the audio is clear and audible.
| Steps | Description |
|---|---|
| Choose the Right Projector | Look for a high-resolution and bright projector with the right throw distance for your screen. |
| Position the Projector | Position the projector level and stable at a distance that is equal to or greater than the throw distance. |
| Set Up the Sound System | Choose a sound system that is compatible with your projector and has enough power to fill the outdoor space. Position it near the screen and test it before the movie. |
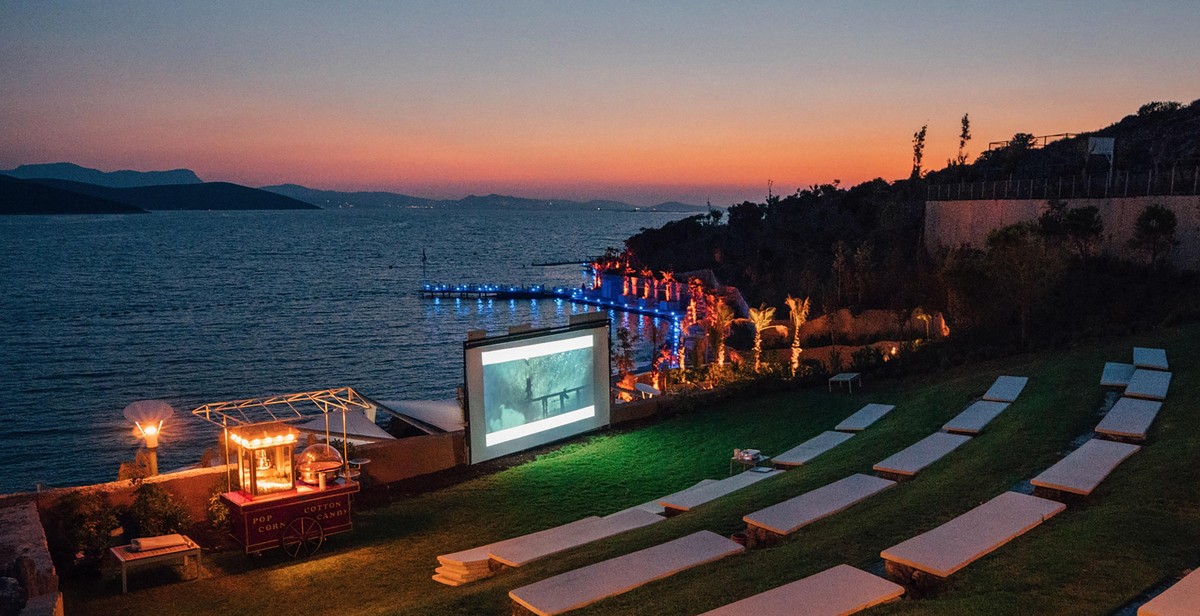
Step 5: Enjoy Your Outdoor Movie Night!
Now that you have your DIY outdoor movie screen ready, it’s time to sit back and enjoy your favorite movies under the stars. Here are a few tips to make your outdoor movie night a success:
1. Choose the Right Movie
When selecting a movie for your outdoor movie night, consider the audience and the occasion. Do you want to watch a family-friendly movie or a classic blockbuster? Do you want to celebrate a special occasion with a themed movie? Whatever your choice, make sure it’s something everyone will enjoy.
2. Set Up Comfortable Seating
Make sure everyone has a comfortable place to sit during the movie. You can use blankets, pillows, or outdoor chairs. If you have a large group, consider renting or borrowing chairs or renting a projector and screen to accommodate everyone.
3. Create a Snack Station
No movie night is complete without snacks! Set up a snack station with popcorn, candy, and drinks. You can also offer healthier options like fruit or veggies with dip. Make sure to have enough for everyone and have a variety of options to choose from.
4. Set the Mood
Enhance the movie-watching experience by setting the mood. String lights or lanterns can add a cozy ambiance, and candles or a fire pit can add warmth and light. Consider adding some blankets or pillows for extra comfort.
5. Enjoy the Show!
Once everything is set up, it’s time to sit back, relax, and enjoy the show. Don’t forget to turn off any outdoor lights and turn up the volume for an immersive experience.
With these tips, you’re ready to create a memorable outdoor movie night experience for your family and friends. Enjoy!