
How to Make Origami Animals: Step-by-Step Instructions for Folding Paper Creatures
Origami is the Japanese art of paper folding. It is a fun and creative way to make beautiful objects with just a piece of paper. Making origami animals is a popular activity, and it is a great way to spend time with family and friends. In this article, I will provide step-by-step instructions on how to make different origami animals.
Why Learn Origami?
Origami is not only a fun and creative activity, but it also has many benefits. It can help improve hand-eye coordination, concentration, and dexterity. It is a great way to relax and reduce stress. Origami can also be used as a teaching tool in the classroom to teach math, geometry, and problem-solving skills.
What You Will Need
All you need to make origami animals is a square piece of paper. You can use any type of paper, but origami paper is recommended as it is thin and easy to fold. You can find origami paper in craft stores or online.
Some origami models require multiple sheets of paper, but I will specify that in the instructions.
Getting Started
Before you start folding, make sure you have a flat surface to work on. It is also helpful to have a ruler or bone folder to make crisp folds.
Now that you have everything you need, let’s get started on making some origami animals!
Materials Needed for Making Origami Animals
Origami is the art of paper folding, which involves creating intricate designs by folding a single sheet of paper. To make origami animals, you will need the following materials:
1. Origami Paper
The most important material you need for making origami animals is origami paper. This is a special kind of paper that is thin, strong, and easy to fold. It comes in a variety of colors, sizes, and patterns, so you can choose the one that best suits your needs. You can buy origami paper from any craft store or online.
2. Scissors
Although you can make origami animals without using scissors, having a pair of scissors can be handy. You will need them to cut the paper into the right size and shape, especially if you are using regular paper instead of origami paper.
3. Ruler
A ruler is also useful for measuring and cutting the paper. It can help you create precise folds and creases, which are essential for making complex origami animals.
4. Pencil
A pencil can be used to mark the paper before folding. This can help you keep track of where you need to fold and where you need to cut.
5. Bone Folder
A bone folder is a tool used to crease paper. It is made of bone or plastic and has a pointed end that can be used to make sharp creases. This tool can help you create neat and crisp folds, which are important for making origami animals.
6. Glue (Optional)
Although origami animals are usually made without glue, you may need it for some designs. If you want to add more stability to your origami animals, you can use a small amount of glue to hold the folds together.
7. Patience and Practice
Finally, you will need patience and practice to make origami animals. Origami requires a lot of concentration and precision, so don’t get discouraged if your first attempts don’t turn out as expected. With practice, you will improve your skills and be able to create more complex designs.
| Materials | Quantity |
|---|---|
| Origami Paper | 1 pack |
| Scissors | 1 pair |
| Ruler | 1 |
| Pencil | 1 |
| Bone Folder | 1 |
| Glue | Optional |
Basic Folds for Origami Animals
Origami is the Japanese art of folding paper into various shapes and figures. It is a simple yet intricate craft that requires a lot of patience and practice. There are several basic folds that you need to learn in order to create origami animals. These folds include the valley fold, mountain fold, and reverse fold.
Valley Fold
The valley fold is one of the most basic folds in origami. It is created by folding the paper in half, bringing the two edges together, and creasing along the center. This creates a “valley” or indentation in the paper. The valley fold is represented by a dashed line in origami diagrams.
To create a valley fold:
- Take a square piece of paper and fold it in half diagonally to create a triangle.
- Unfold the paper and fold it in half diagonally the other way to create another triangle.
- Unfold the paper again and you will see a crease down the center of the paper.
- Bring the two edges of the paper together, folding it along the center crease.
- Crease the paper along the fold to create a valley.
Mountain Fold
The mountain fold is the opposite of the valley fold. It creates a “mountain” or raised section in the paper. The mountain fold is represented by a solid line in origami diagrams.
To create a mountain fold:
- Take a square piece of paper and fold it in half diagonally to create a triangle.
- Unfold the paper and fold it in half diagonally the other way to create another triangle.
- Flip the paper over to the other side.
- Bring the two edges of the paper together, folding it along the center crease.
- Crease the paper along the fold to create a mountain.
Reverse Fold
The reverse fold is a more advanced fold that creates a 3D effect in origami animals. It involves folding a section of the paper back on itself and then folding it in a different direction. The reverse fold is represented by a dotted and solid line in origami diagrams.
To create a reverse fold:
- Take a square piece of paper and fold it in half diagonally to create a triangle.
- Unfold the paper and fold it in half diagonally the other way to create another triangle.
- Flip the paper over to the other side.
- Take one corner of the paper and fold it up to the top point of the triangle.
- Unfold the corner and make a crease along the edge of the fold.
- Open up the paper and fold the corner down along the crease you just made.
- Crease the paper along the new fold to create a reverse fold.
| Basic Fold | Description |
|---|---|
| Valley Fold | A fold that creates a “valley” or indentation in the paper. |
| Mountain Fold | A fold that creates a “mountain” or raised section in the paper. |
| Reverse Fold | A fold that creates a 3D effect by folding a section of the paper back on itself and then in a different direction. |
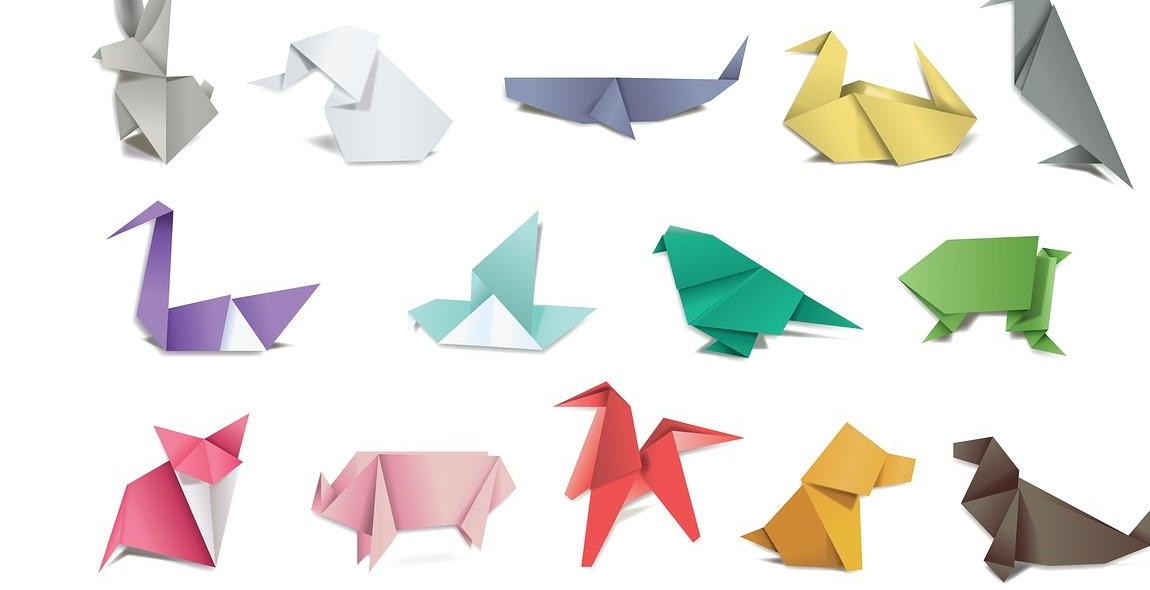
Origami Animals
Origami is the art of paper folding, which is not only a fun activity but also a creative way to make various objects. In this section, we will provide step-by-step instructions for folding five different origami animals. These instructions are easy to follow and suitable for beginners and experts alike. Let’s dive in!
1. Origami Dog
The origami dog is a classic design that is easy to make. Start with a square piece of paper and follow these steps:
- Fold the paper in half diagonally to form a triangle.
- Unfold the paper and fold the two corners to meet at the center crease.
- Flip the paper over and fold the bottom edge up to the top edge.
- Turn the paper over again and fold the two corners down to form the dog’s ears.
- Draw or glue on the dog’s features, such as eyes, nose, and mouth.
2. Origami Cat
The origami cat is another popular design that is simple to create. Follow these instructions to make your own:
- Start with a square piece of paper and fold it in half diagonally to form a triangle.
- Unfold the paper and fold the two corners to meet at the center crease.
- Flip the paper over and fold the bottom edge up to the top edge.
- Turn the paper over again and fold the two corners down to form the cat’s ears.
- Draw or glue on the cat’s features, such as eyes, nose, and whiskers.
3. Origami Frog
The origami frog is a fun and easy design that is perfect for kids. Follow these steps to create your own:
- Start with a square piece of paper and fold it in half diagonally to form a triangle.
- Unfold the paper and fold the two corners to meet at the center crease.
- Flip the paper over and fold the bottom edge up to the top edge.
- Turn the paper over again and fold the two corners down to form the frog’s legs.
- Draw or glue on the frog’s features, such as eyes, mouth, and spots.
4. Origami Bird
The origami bird is a beautiful design that is a bit more challenging than the previous animals. Follow these instructions to make your own:
- Start with a square piece of paper and fold it in half diagonally to form a triangle.
- Unfold the paper and fold the two corners to meet at the center crease.
- Flip the paper over and fold the bottom edge up to the top edge.
- Fold the two corners down to form the bird’s wings.
- Unfold the wings slightly and draw or glue on the bird’s features, such as eyes, beak, and feathers.
5. Origami Fish
The origami fish is a beautiful and elegant design that is perfect for decoration. Follow these instructions to create your own:
- Start with a square piece of paper and fold it in half diagonally to form a triangle.
- Unfold the paper and fold the two corners to meet at the center crease.
- Flip the paper over and fold the bottom edge up to the top edge.
- Turn the paper over again and fold the two corners down to form the fish’s tail.
- Draw or glue on the fish’s features, such as eyes, scales, and fins.
| Dog | Cat | Frog | Bird | Fish | |||||
 |
Conclusion
Origami is a fun and creative way to spend your time. Creating paper animals can be a relaxing and rewarding activity that anyone can enjoy. With the step-by-step instructions provided in this article, you can easily create your own origami animals. Tips for Success
Benefits of OrigamiOrigami is not only a fun hobby, but it also has many benefits. Folding paper animals can improve your concentration and focus. It can also help reduce stress and anxiety, as it requires you to focus on the task at hand and forget about your worries. Additionally, origami can improve your spatial awareness and fine motor skills. Start Folding!Now that you have all the information you need, it’s time to start folding! Whether you’re a beginner or an experienced folder, creating origami animals is a great way to spend your time and improve your skills. So grab some paper and get started!
|