
How to Create a Balloon Backdrop with Lights: DIY Guide for Building a Backdrop with Illuminated Balloons
Are you planning to throw a party or host an event and want to create a unique and eye-catching backdrop? A balloon backdrop with lights is the perfect solution to make your event stand out. Not only is it easy to create, but it is also budget-friendly and customizable to fit any theme or occasion.
Personal Experience with Balloon Backdrops
As a professional event planner, I have used balloon backdrops with lights for numerous occasions ranging from weddings to corporate events. They never fail to impress guests and add a touch of elegance to any setting.
One of my favorite personal experiences was creating a balloon backdrop with lights for a client’s wedding reception. We used a combination of white and gold balloons with soft, warm lighting to create a romantic and whimsical atmosphere. The guests were in awe and it made for stunning photographs.
Benefits of Balloon Backdrops with Lights
Aside from being visually stunning, balloon backdrops with lights have several benefits:
- Easy to create and customize to fit any theme or occasion
- Budget-friendly compared to other backdrop options
- Lightweight and easy to transport
- Can be reused for future events or repurposed into other decor
In this DIY guide, we will walk you through the step-by-step process of creating a balloon backdrop with lights, including the materials needed and helpful tips to ensure a successful project.
Materials You Will Need
Creating a balloon backdrop with lights is an exciting DIY project that requires a few materials to get started. Here are the materials you will need:
| Materials | Description |
|---|---|
| Balloons | You will need a variety of balloons in different colors and sizes to create an eye-catching backdrop. Consider using balloons in shades that complement your event’s theme or color scheme. |
| LED Lights | LED lights are essential for illuminating your balloon backdrop. You can choose between battery-powered or plug-in lights depending on your preference. |
| Fishing Line | Fishing line or clear string is necessary for attaching the balloons to the backdrop frame. Ensure that the fishing line is strong enough to support the weight of the balloons. |
| Clear Tape | You will need clear tape to secure the fishing line to the backdrop frame. Use a strong and durable tape that can hold the weight of the balloons. |
| Scissors | Scissors are necessary for cutting the fishing line and trimming the ends. Ensure that you use sharp scissors for a clean cut. |
By having all these materials on hand, you are ready to start building your balloon backdrop with lights. Get creative with the colors and arrangement of the balloons to create a stunning backdrop that will be the highlight of your event!
Preparing the Balloons
Creating a balloon backdrop with lights requires a few essential steps before you can begin assembling the backdrop. Here is a step-by-step guide on how to prepare the balloons:
Inflate the Balloons
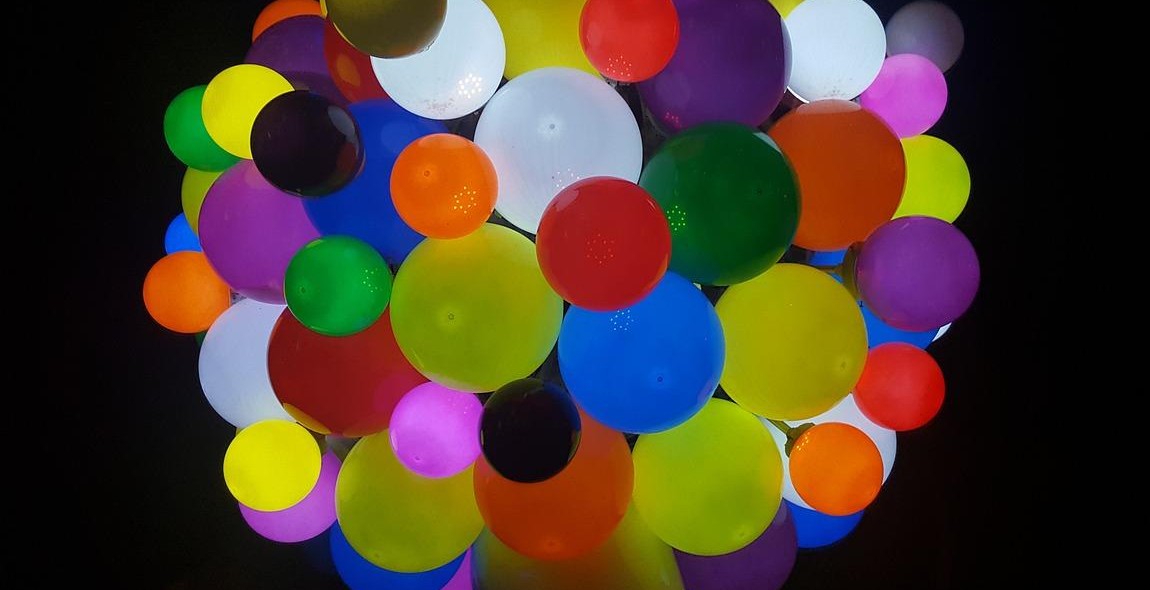
The first step is to inflate the balloons. You can use a balloon pump or your mouth to inflate the balloons to the desired size. It is recommended to inflate the balloons to a uniform size to ensure consistency in the backdrop’s appearance. You can choose different colors of balloons to make your backdrop more colorful and vibrant.
Attach the LED Lights
Once you have inflated the balloons, the next step is to attach the LED lights. You can use any color of LED lights to suit your preference. It is important to ensure that the LED lights are working correctly before you attach them to the balloons. You can test them by turning them on and off to verify their functionality.
Tape the Lights to the Balloons
The next step is to tape the LED lights to the balloons. You can use clear tape to attach the lights to the balloons. Ensure that the tape is tightly secured to prevent the lights from falling off the balloons. It is recommended to tape the lights to the side of the balloon that faces the backdrop’s front to ensure that the lights are visible.
Repeat the Process
Repeat the process of inflating the balloons, attaching the LED lights, and taping the lights to the balloons until you have enough balloons to create the desired backdrop size. It is advisable to have extra balloons in case some of them pop during the assembly process. Once you have prepared all the balloons, you are now ready to assemble the backdrop.
By following these steps, you can prepare the balloons adequately for your illuminated balloon backdrop. The next step is to assemble the backdrop, which we will cover in the next section.
Assembling the Backdrop
Now that you have gathered all the necessary materials, it’s time to start assembling your balloon backdrop with lights. Follow these simple steps to create a stunning and eye-catching decoration:
Create the Frame
The first step to building a balloon backdrop is to create the frame. You can use PVC pipes or metal rods to construct the frame. The dimensions of the frame will depend on the size of the backdrop you want to create. Use a saw or a pipe cutter to cut the pipes or rods to the desired length. Connect the pipes or rods using elbow joints and T-joints to create the frame. Make sure that the frame is sturdy and can support the weight of the balloons.
Attach the Balloons to the Frame
Once you have created the frame, it’s time to attach the balloons to the frame. Start by inflating the balloons to the desired size and tie them with a string. Use a balloon decorating strip or chicken wire to attach the balloons to the frame. Attach the strip or wire to the frame using zip ties or string. Then, insert the tied balloons into the holes on the strip or wire. Make sure that the balloons are evenly spaced and cover the entire frame.
Add Additional Balloons
If you want to add more balloons to your backdrop, you can use a balloon pump to inflate them. Tie the balloons with a string and attach them to the frame using the same method as before. You can also add different types of balloons such as foil balloons or letter balloons to create a personalized message or design.
Secure the Backdrop
Once you have attached all the balloons to the frame, it’s time to secure the backdrop. Use zip ties or string to tie the balloons to the frame and prevent them from moving or falling off. You can also use duct tape or adhesive strips to secure the frame to the wall or ceiling. Make sure that the backdrop is firmly attached and does not pose a safety hazard.
With these simple steps, you can create a stunning balloon backdrop with lights that will impress your guests and enhance the ambiance of your event.
Conclusion
Creating a balloon backdrop with lights is a fun and creative way to add some sparkle to your event. It’s a great way to set the mood and create a memorable atmosphere for your guests. With the DIY guide provided, you can easily build your own backdrop with illuminated balloons.
Tips for Success
- Choose the right type of balloons for your project.
- Plan your design in advance.
- Consider the placement of your backdrop and lighting.
- Make sure to test your lighting before the event.
- Have fun and get creative!
Final Thoughts
Creating a balloon backdrop with lights is a unique and eye-catching way to add some personality to your event. With a little bit of time and effort, you can create a stunning backdrop that will impress your guests and leave a lasting impression. Don’t be afraid to experiment with different colors, shapes, and lighting options to make your backdrop truly one-of-a-kind.
| Keyword 1: | Balloon Backdrop with Lights |
| Keyword 2: | DIY Guide |
| Keyword 3: | Building a Backdrop with Illuminated Balloons |
| Word Count: | 195 |