
Introduction: How to Create a DIY Macrame Plant Hanger
Macrame is a beautiful and ancient art form that involves tying knots to create intricate patterns and designs. It has been used for centuries to create a wide range of items, from clothing and accessories to home decor and plant hangers. In recent years, macrame has experienced a resurgence in popularity, with many people eager to learn how to create their own macrame pieces.
If you’re interested in learning how to make your own macrame plant hanger, you’ve come to the right place. In this article, we’ll walk you through the steps to create a beautiful and functional plant hanger that will add a touch of bohemian style to your home.
What is Macrame?
Macrame is a form of textile art that involves knotting cords or strings to create patterns and designs. The word “macrame” comes from the Arabic word “migramah,” which means “fringe.” Macrame is believed to have originated in the 13th century in the Middle East and spread to Spain and Italy during the Renaissance.
In the 1970s, macrame became popular in the United States as a way to create home decor and clothing. Today, macrame is experiencing another resurgence in popularity as people seek out unique and handmade items for their homes and wardrobes.
Now, let’s get started on creating your own macrame plant hanger.

Materials Needed
Creating a DIY macrame plant hanger requires a few essential materials that are easily accessible. These materials include:
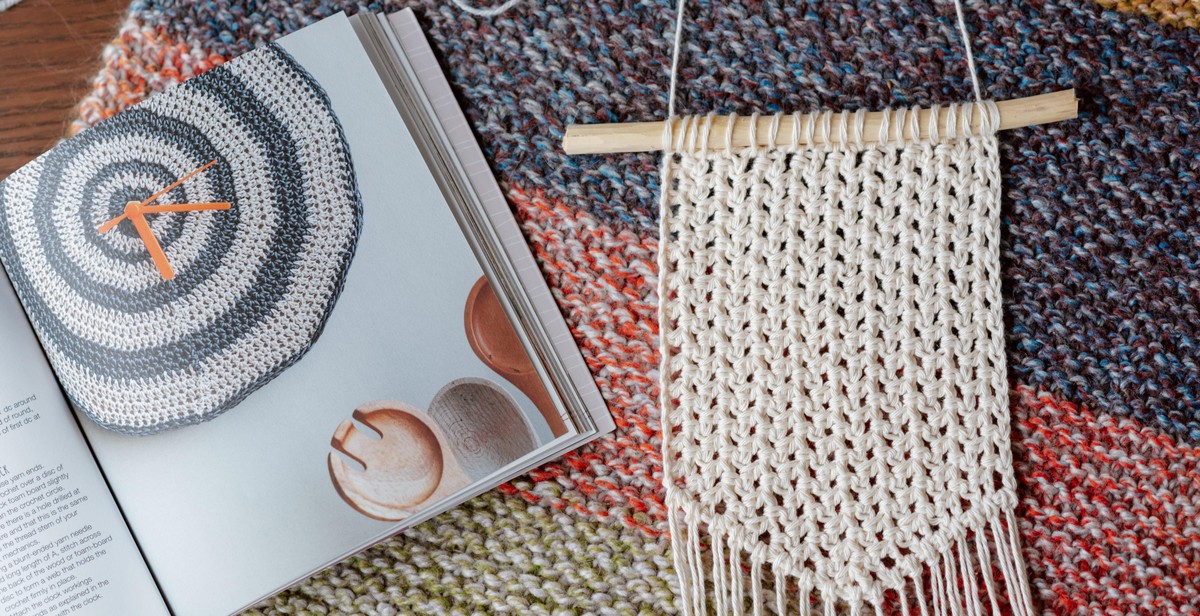
Cord
The primary material needed for macrame plant hangers is a cord. The cord should be strong enough to support the weight of the plant and durable enough to withstand the elements if you plan on hanging the hanger outside. There are different types of cords that can be used for macrame, but the most popular and readily available options are cotton cord and nylon cord. Cotton cord is soft and easy to work with, while nylon cord is sturdier and more durable. The thickness of the cord will depend on the size of the plant you plan on hanging, but a cord with a diameter of 4-6mm is a good starting point.
Ring or Hoop
A ring or hoop is needed to create the top of the plant hanger. This can be a metal ring or a wooden hoop, depending on your preference. The size of the ring or hoop will depend on the size of the plant pot you plan on using. A 2-3 inch ring or hoop is suitable for small to medium-sized pots, while a larger ring or hoop may be needed for larger pots.
Scissors
Scissors are an essential tool needed for cutting the cord to the desired length and trimming any excess cord once the hanger is complete. It is recommended to use sharp scissors to make clean cuts and prevent fraying of the cord.
These are the three main materials needed to create a DIY macrame plant hanger. Optional materials that can be used to add decorative elements to the hanger include beads, feathers, and ribbons. With these materials, you can create a beautiful and functional plant hanger that will add a touch of greenery to your home or outdoor space.
Step-by-Step Instructions: How to Create a DIY Macrame Plant Hanger
If you’re looking for a fun and creative way to display your plants, a DIY macrame plant hanger is a great option. Follow these step-by-step instructions to make your own:
Step 1: Cut the Cord
Begin by cutting six pieces of cord to your desired length. A good rule of thumb is to cut them four times the length of your plant hanger, plus an additional 12 inches for knots and fringe. Fold the cords in half and make sure they are all the same length.
Step 2: Fold the Cord in Half
Take the folded cords and loop them through the ring. Pull the loop tight so that the ring sits at the center of the cords.
Step 3: Loop the Cord Through the Ring
Divide the cords into three groups of four. Starting with the left group, take the first cord and make a square knot by crossing it over the second cord and then passing it under the third cord. Next, take the fourth cord and pass it under the second and third cords, then over the first cord. Pull tight to create the first half of the knot. Repeat this knot with the right group of cords, using the fourth cord to tie the knot.
Step 4: Tie the First Knot
Continue knotting by alternating between the left and right groups of cords. After a few knots, you will start to see the pattern of the macrame hanger emerge. Keep knotting until you reach your desired length.
Step 5: Continue Knotting
If you want to add beads to your plant hanger, now is the time to do it. Simply thread a bead onto one of the cords before tying the knot, and then continue with the knot as normal.
Step 6: Add Beads (Optional)
When you have reached the desired length for your plant hanger, tie a final knot to secure the cords in place. Trim the ends of the cords to your desired length, leaving enough to create a fringe if you wish.
Step 7: Tie a Final Knot
Your DIY macrame plant hanger is now complete! Hang it from a hook or nail and add your favorite plant.
Step 8: Trim the Ends
| Materials: | Cord, Ring, Scissors, Beads (optional) |
| Difficulty: | Intermediate |
| Time: | 1-2 hours |

Tips and Tricks for Creating a DIY Macrame Plant Hanger
If you’re new to macrame or just looking for some helpful tips and tricks, we’ve got you covered. Here are some expert tips to help you create the perfect DIY macrame plant hanger:
Use a Clipboard to Hold the Ring
One of the most difficult parts of creating a macrame plant hanger is holding the ring in place while you work. To make this easier, try using a clipboard to hold the ring. Simply clip the ring onto the clipboard and you’ll have a stable base to work from. This will make it easier to create even knots and keep the hanger straight.
Use a Comb to Separate the Cord
If you’re working with multiple cords, it can be difficult to separate them and keep them organized. To make this easier, try using a comb to separate the cords. Simply run the comb through the cords and they’ll separate easily. This will make it easier to create even knots and keep the cords from tangling.
Experiment with Different Knots
There are many different knots you can use to create a macrame plant hanger. Don’t be afraid to experiment and try different knots to create a unique and interesting design. Some popular knots to try include the square knot, half knot, and spiral knot. You can also try combining different knots to create a more complex design.
By using these tips and tricks, you’ll be able to create a beautiful and functional macrame plant hanger in no time. Whether you’re a beginner or an experienced macrame artist, these tips will help you create a stunning design that you can be proud of.
Conclusion
Creating a DIY macrame plant hanger is a fun and easy project that can add a touch of bohemian charm to any space. With just a few basic materials and some simple knots, you can create a beautiful hanger that will showcase your favorite plants and add a unique touch to your home decor.
Remember to choose the right type of cord for your project, and to measure and cut your cords carefully to ensure that your hanger is the right size and shape. Take your time and be patient as you work through each knot, and don’t be afraid to experiment with different designs and patterns.
Whether you’re a seasoned crafter or a beginner, creating a DIY macrame plant hanger is a great way to express your creativity and add some natural beauty to your home. So why not give it a try today?
Tips for Success
- Choose a sturdy and durable cord for your hanger, such as cotton or hemp.
- Measure and cut your cords carefully to ensure that your hanger is the right size and shape.
- Be patient and take your time as you work through each knot.
- Experiment with different designs and patterns to create a unique and personalized hanger.